SpringBoot Application 深入学习
本节主要介绍 SpringBoot Application 类相关源码的深入学习.
主要包括:
SpringBoot 应用自定义启动配置
SpringBoot 应用生命周期, 以及在生命周期各个阶段自定义配置.
本节采用 SpringBoot 2.1.10.RELASE, 对应示例源码在: https://github.com/laolunsi/spring-boot-examples
SpringBoot 应用启动过程:
- SpringApplication application = new SpringApplication(DemoApplication.class);
- application.run(args);
一, Application 类自定义启动配置
创建 SpringApplication 对象后, 在调用 run 方法之前, 我们可以使用 SpringApplication 对象来添加一些配置, 比如禁用 banner, 设置应用类型, 设置配置文件 (profile)
举例:
- @SpringBootApplication
- public class DemoApplication {
- public static void main(String[] args) {
- SpringApplication application = new SpringApplication(DemoApplication.class);
- // 设置 banner 禁用
- application.setBannerMode(Banner.Mode.OFF);
- // 将 application-test 文件启用为 profile
- application.setAdditionalProfiles("test");
- // 设置应用类型为 NONE, 即启动完成后自动关闭
- application.setwebApplicationType(WebApplicationType.NONE);
- application.run(args);
- }
- }
也可以使用 SpringApplicationBuilder 类来创建 SpringApplication 对象, builder 类提供了链式调用的 API, 更方便调用, 增强了可读性.
- new SpringApplicationBuilder(YqManageCenterApplication.class)
- .bannerMode(Banner.Mode.OFF)
- .profiles("test")
- .Web(WebApplicationType.NONE)
- .run(args);
二, application 生命周期
SpringApplication 的生命周期主要包括:
准备阶段: 主要包括加载配置, 设置主 bean 源, 推断应用类型 (三种), 创建和设置 SpringBootInitializer, 创建和设置 Application 监听器, 推断主入口类
运行阶段: 开启时间监听, 加载运行监听器, 创建 Environment, 打印 banner, 创建和装载 context, 广播应用已启动, 广播应用运行中
我们先来看一下源码的分析:
SpringBootApplication 构造器:
- public SpringApplication(ResourceLoader resourceLoader, Class<?>... primarySources) {
- // 设置默认配置
- this.sources = new LinkedHashSet();
- this.bannerMode = Mode.CONSOLE;
- this.logStartupInfo = true;
- this.addCommandLineProperties = true;
- this.addConversionService = true;
- this.headless = true;
- this.registerShutdownHook = true;
- this.additionalProfiles = new HashSet();
- this.isCustomEnvironment = false;
- this.resourceLoader = resourceLoader;
- Assert.notNull(primarySources, "PrimarySources must not be null");
- // 设置主 bean 源
- this.primarySources = new LinkedHashSet(Arrays.asList(primarySources));
- // 推断和设置应用类型 (三种)
- this.webApplicationType = WebApplicationType.deduceFromClasspath();
- // 创建和设置 SpringBootInitializer
- this.setInitializers(this.getSpringFactoriesInstances(ApplicationContextInitializer.class));
- // 创建和设置 SpringBoot 监听器
- this.setListeners(this.getSpringFactoriesInstances(ApplicationListener.class));
- // 推断和设置主入口类
- this.mainApplicationClass = this.deduceMainApplicationClass();
- }
SpringApplication.run 方法源码:
- public ConfigurableApplicationContext run(String... args) {
- // 开启时间监听
- StopWatch stopWatch = new StopWatch();
- stopWatch.start();
- ConfigurableApplicationContext context = null;
- Collection<SpringBootExceptionReporter> exceptionReporters = new ArrayList();
- this.configureHeadlessProperty();
- // 加载 Spring 应用运行监听器 (SpringApplicationRunListenter)
- SpringApplicationRunListeners listeners = this.getRunListeners(args);
- listeners.starting();
- Collection exceptionReporters;
- try {
- // 创建 environment(包括 PropertySources 和 Profiles)
- ApplicationArguments applicationArguments = new DefaultApplicationArguments(args);
- ConfigurableEnvironment environment = this.prepareEnvironment(listeners, applicationArguments);
- this.configureIgnoreBeanInfo(environment);
- // 打印 banner
- Banner printedBanner = this.printBanner(environment);
- // 创建 context(不同的应用类型对应不同的上下文)
- context = this.createApplicationContext();
- exceptionReporters = this.getSpringFactoriesInstances(SpringBootExceptionReporter.class, new Class[]{ConfigurableApplicationContext.class}, context);
- // 装载 context(其中还初始化了 IoC 容器)
- this.prepareContext(context, environment, listeners, applicationArguments, printedBanner);
- // 调用 applicationContext.refresh
- this.refreshContext(context);
- // 空方法
- this.afterRefresh(context, applicationArguments);
- stopWatch.stop(); // 关闭时间监听; 这样可以计算出完整的启动时间
- if (this.logStartupInfo) {
- (new StartupInfoLogger(this.mainApplicationClass)).logStarted(this.getApplicationLog(), stopWatch);
- }
- // 广播 SpringBoot 应用已启动, 会调用所有 SpringBootApplicationRunListener 里的 started 方法
- listeners.started(context);
- // 遍历所有 ApplicationRunner 和 CommadnLineRunner 的实现类, 执行其 run 方法
- this.callRunners(context, applicationArguments);
- } catch (Throwable var10) {
- this.handleRunFailure(context, var10, exceptionReporters, listeners);
- throw new IllegalStateException(var10);
- }
- try {
- // 广播 SpringBoot 应用运行中, 会调用所有 SpringBootApplicationRunListener 里的 running 方法
- listeners.running(context);
- return context;
- } catch (Throwable var9) {
- // run 出现异常时, 处理异常; 会调用报错的 listener 里的 failed 方法, 广播应用启动失败, 将异常扩散出去
- this.handleRunFailure(context, var9, exceptionReporters, (SpringApplicationRunListeners)null);
- throw new IllegalStateException(var9);
- }
- }
三, application 生命周期自定义配置
在 SpringApplication 的生命周期中, 我们还可以添加一些自定义的配置.
下面的配置, 主要是通过实现 Spring 提供的接口, 然后在 resources 下新建 META-INF/spring.factories 文件, 在里面添加这个类而实现引入的.
在准备阶段, 可以添加如下自定义配置:
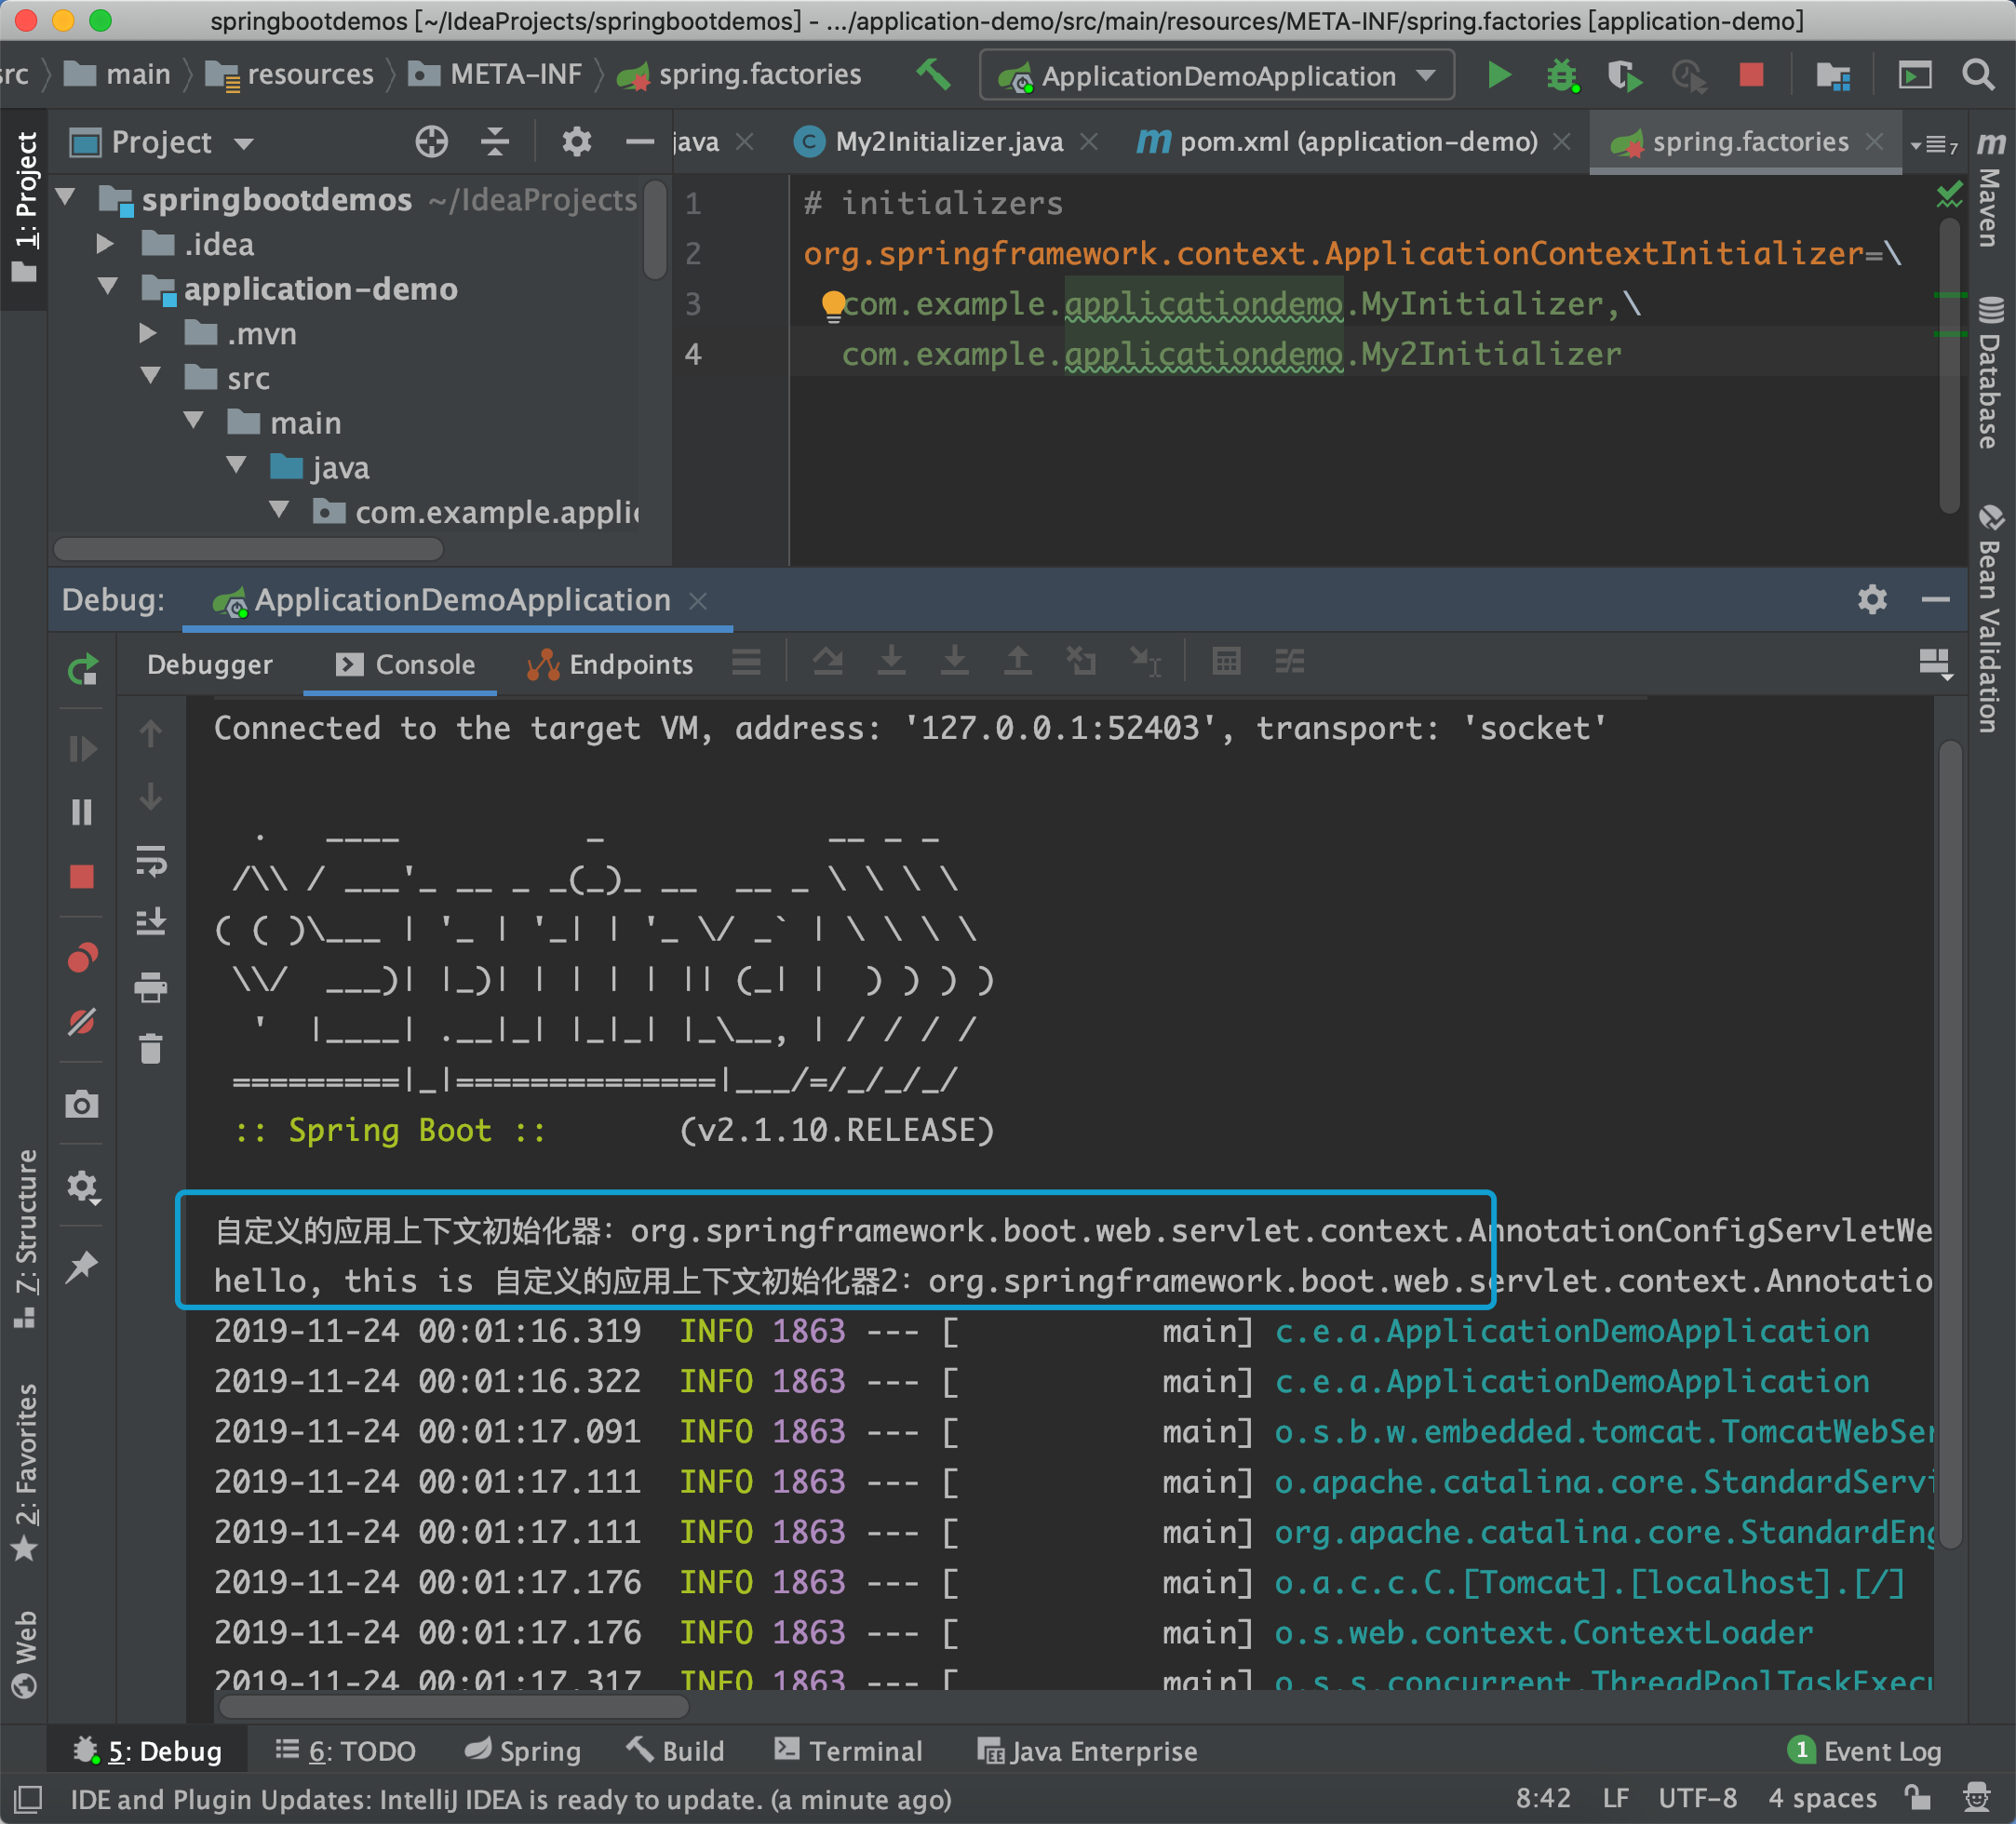
3.1 自定义 ApplicationContextInitializer 的实现类
- @Order(100)
- public class MyInitializer implements ApplicationContextInitializer {
- @Override
- public void initialize(ConfigurableApplicationContext configurableApplicationContext) {
- System.out.println("自定义的应用上下文初始化器:" + configurableApplicationContext.toString());
- }
- }
再定义一个 My2Initializer, 设置 @Order(101)
然后在 spring.factories 文件里如下配置:
- # initializers
- org.springframework.context.ApplicationContextInitializer=\
- com.example.applicationdemo.MyInitializer,\
- com.example.applicationdemo.My2Initializer
启动项目:

3.2 自定义 ApplicationListener 的实现类
- @FunctionalInterface
- public interface ApplicationListener<E extends ApplicationEvent> extends EventListener {
- void onApplicationEvent(E var1);
- }
即监听 ApplicationEvents 类的 ApplicationListener 接口的实现类.
首先查看有多少种 ApplicationEvents:
里面还可以进行拆分.
我们这里设置两个 ApplicationListener, 都用于监听 ApplicationEnvironmentPreparedEvent
- @Order(200)
- public class MyApplicationListener implements ApplicationListener<ApplicationEnvironmentPreparedEvent> {
- @Override
- public void onApplicationEvent(ApplicationEnvironmentPreparedEvent applicationEnvironmentPreparedEvent) {
- System.out.println("MyApplicationListener: 应用环境准备完毕" + applicationEnvironmentPreparedEvent.toString());
- }
- }
在 spring.factories 中加入 applicationListener 的配置:
- # application-listeners
- org.springframework.context.ApplicationListener=\
- com.example.applicationdemo.MyApplicationListener,\
- com.example.applicationdemo.MyApplicationListener2
在启动阶段, 可以添加如下自定义配置:
3.3 自定义 SpringBootRunListener 的实现类
监听整个 SpringBoot 应用生命周期
- public interface SpringApplicationRunListener {
- // 应用启动
- void starting();
- // 应用 ConfigurableEnvironment 准备完毕, 此刻可以将其调整
- void environmentPrepared(ConfigurableEnvironment environment);
- // 上下文准备完毕
- void contextPrepared(ConfigurableApplicationContext context);
- // 上下文装载完毕
- void contextLoaded(ConfigurableApplicationContext context);
- // 启动完成 (Beans 已经加载到容器中)
- void started(ConfigurableApplicationContext context);
- // 应用运行中
- void running(ConfigurableApplicationContext context);
- // 应用运行失败
- void failed(ConfigurableApplicationContext context, Throwable exception);
- }
我们可以自定义 SpringApplicationRunListener 的实现类, 通过重写以上方法来定义自己的 listener.
比如:
- public class MyRunListener implements SpringApplicationRunListener {
- // 注意要加上这个构造器, 两个参数都不能少, 否则启动会报错, 报错的详情可以看这个类的最下面
- public MyRunListener(SpringApplication springApplication, String[] args) {
- }
- @Override
- public void starting() {
- System.out.println("MyRunListener: 程序开始启动");
- }
- // 其他方法省略, 不做修改
- }
然后在 spring.factories 文件中添加这个类:
- org.springframework.boot.SpringApplicationRunListener=\
- com.example.applicationdemo.MyRunListener
启动:
3.4 自定义 ApplicationRunner 或 CommandLineRunner
application 的 run 方法中, 有这样一行:
this.callRunners(context, applicationArguments);
仔细分析源码, 发现这一句的作用是: SpringBoot 应用启动过程中, 会遍历所有的 ApplicationRunner 和 CommandLineRunner, 执行其 run 方法.
- private void callRunners(ApplicationContext context, ApplicationArguments args) {
- List<Object> runners = new ArrayList();
- runners.addAll(context.getBeansOfType(ApplicationRunner.class).values());
- runners.addAll(context.getBeansOfType(CommandLineRunner.class).values());
- AnnotationAwareOrderComparator.sort(runners);
- Iterator var4 = (new LinkedHashSet(runners)).iterator();
- while(var4.hasNext()) {
- Object runner = var4.next();
- if (runner instanceof ApplicationRunner) {
- this.callRunner((ApplicationRunner)runner, args);
- }
- if (runner instanceof CommandLineRunner) {
- this.callRunner((CommandLineRunner)runner, args);
- }
- }
- }
- @FunctionalInterface
- public interface CommandLineRunner {
- void run(String... args) throws Exception;
- }
- @FunctionalInterface
- public interface ApplicationRunner {
- void run(ApplicationArguments args) throws Exception;
- }
分别定义一个实现类, 添加 @Component, 这两个实现类不需要在 spring.factories 中配置.
好了, 关于这些自定义配置的具体使用, 后续会继续进行介绍, 请持续关注! 感谢!
具体示例代码请去 https://github.com/laolunsi/spring-boot-examples 查看.
来源: https://www.cnblogs.com/eknown/p/11927067.html
与本文相关文章
- 深入学习 Spring 框架 (三)- AOP 面向切面
- Debug - SpringBoot - Error starting ApplicationContext. To display the auto-configuration report re-runyour application
- SpringBoot 学习 3:springboot 整合 filter
- java NIO 深入学习
- SpringBoot 框架学习与应用
- SpringBoot 学习 4:springboot 整合 listener
- [Java] SpringBoot 中从 application.YAML 中获取自定义常量
- 《深入理解 C# (第 2 版)》 - 学习笔记