-
当前位置:
- 首页
- /
- IT
- /
- 程序
- /
- Objective-C
- /
- (4.1.37.1)深入理解setContentView过程和View绘制过程
(4.1.37.1)深入理解setContentView过程和View绘制过程
- 一Android屏幕层级
- 1 Window概念
- 11 PhoneWindow
- 1 Window概念
- 二setContentView过程
- 三View绘制前过程
- 1 ViewRoot
- 2 View绘制的起点
- 四 View绘制
- 1 测量measure阶段
- 11 重写View和ViewGroup时的Measur过程
- 111 onMeasure中的参数 计划宽高的生成规则
- 112 setMeasuredDimension设置自身实际测量宽高
- 12 measure过程
- 121 measureChildWithMargin方法
- 121 resolveSizeAndState方法取舍孩子期望宽高和父亲计划宽高
- 123 ViewonMeasure的默认实现
- 11 重写View和ViewGroup时的Measur过程
- 2 布局layout阶段
- 21 重写View或ViewGroup的onLayout
- 22 layout过程
- 3 绘制draw阶段
- 31 重写View或ViewGroup的onDraw
- 32 draw过程
- 321 画布生成过程
- 322 Viewdraw迭代过程
- 1 测量measure阶段
- 五View的生命周期
- 1 显示过程
- 2 invalidaterequsetLaytout与requestFocus
- 3 requestLayout引发过程
- 31 PFLAG_FORCE_LAYOUT标示
- 4 invalidate引发过程
- 5 postInvalidate引发过程
- 参考文献
开始先放个大招吧,一图熟记所有过程:
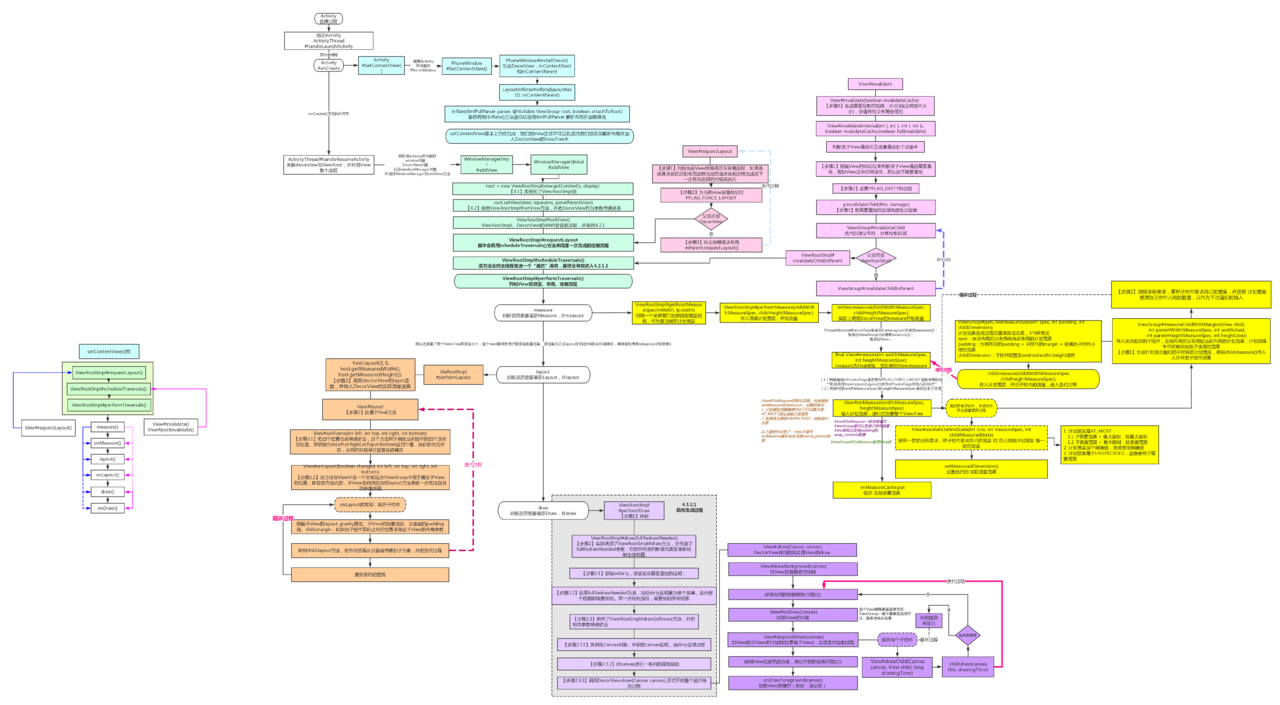
查看原图
本篇文章其实就是对上述图示的解说过程,侧重于对整体流程的分析,目的是把View绘制的整个流程把握好,而对于特定实现细节则可以日后再对相应源码进行研读,整体步骤可以分为:
- setContentView过程
- View绘制前过程: DectorView 与 ViewRoot关联,并将dector投入window
- View绘制过程
- measure: 判断是否需要重新计算View的大小,需要的话则计算;
递归式测量整个ViewTree的实际大小,为正式布局提供建议。(注意,只是建议,至于用不用,要看onLayout); - layout: 判断是否需要重新计算View的位置,需要的话则计算;
使用layout()函数对所有子控件布局,得出每一个view的相对绘制位置矩阵(相对父布局的top,left,bottom,right),最终构成全局相对位置绘制树; - draw: 判断是否需要重新绘制View,需要的话则重绘制。
- measure: 判断是否需要重新计算View的大小,需要的话则计算;
一、Android屏幕层级
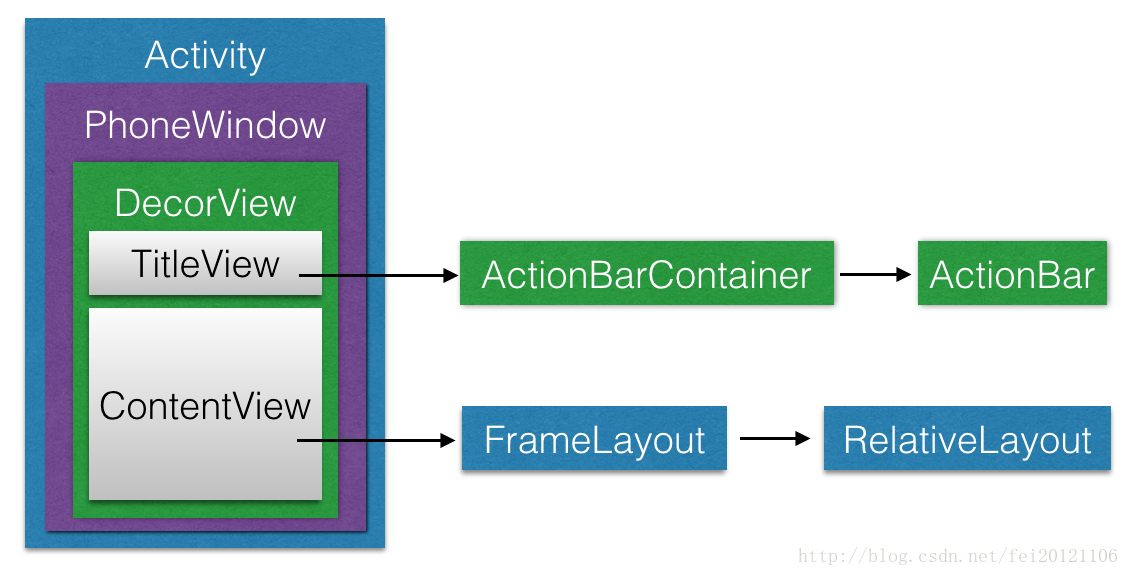
- PhoneWindow:窗口的具体实现,譬如Activity,一个Dialog,一个Toast,一个Menu菜单等
- DecorView(FrameLayout):一个应用窗口的根容器
- mContentRoot (LinearLayout):是DecorView本身或者是DecorView的一个子元素,在PhoneWindow#generateLayout通过加载预设layout实例,包含两个子元素,一个是TitleView,另一个是ContentView
- TitleView:ActionBar的容器
- ContentView(FrameLayout,contentParent , android.R.id.content):窗口内容的容器, 我们平常用的setContentView就是设置它的子View
1.1 Window概念
Window即窗口,这个概念在Android Framework中的实现为android.view.Window这个抽象类,这个抽象类是对Android系统中的窗口的抽象。在介绍这个类之前,我们先来看看究竟什么是窗口呢?
实际上,窗口是一个宏观的思想,它是屏幕上用于绘制各种UI元素及响应用户输入事件的一个矩形区域。通常具备以下两个特点:
- 独立绘制,不与其它界面相互影响;
- 不会触发其它界面的输入事件;
在Android系统中,窗口是独占一个Surface实例的显示区域,每个窗口的Surface由WindowManagerService分配。我们可以把Surface看作一块画布,应用可以通过Canvas或OpenGL在其上面作画。画好之后,通过SurfaceFlinger将多块Surface按照特定的顺序(即Z-order)进行混合,而后输出到FrameBuffer中,这样用户界面就得以显示。
这个抽象类包含了三个核心组件:
- WindowManager.LayoutParams: 窗口的布局参数;
- Callback: 窗口的回调接口,通常由Activity实现;
- ViewTree: 窗口所承载的控件树。
- public abstract class Window {
- //...
- //指定Activity窗口的风格类型
- public static final int FEATURE_NO_TITLE = 1;
- public static final int FEATURE_INDETERMINATE_PROGRESS = 5;
- //设置布局文件
- public abstract void setContentView(int layoutResID);
- public abstract void setContentView(View view);
- //请求指定Activity窗口的风格类型
- public boolean requestFeature(int featureId) {
- final int flag = 1 << featureId;
- mFeatures |= flag;
- mLocalFeatures |= mContainer != null ? (flag & ~mContainer.mFeatures) : flag;
- return (mFeatures & flag) != 0;
- }
- //...
- }
android.view.Window这个抽象类可以看做Android中对窗口这一宏观概念所做的约定,而PhoneWindow这个类是Framework为我们提供的Android窗口概念的具体实现
1.1.1 PhoneWindow
PhoneWindow这个类是Framework为我们提供的Android窗口的具体实现,该类继承于Window类,是Window类的具体实现,即我们可以通过该类具体去绘制窗口。
并且,该类内部包含了 一个DecorView对象,该DectorView对象是所有应用窗口(Activity界面)的根View。
- 我们平时调用setContentView()方法设置Activity的用户界面时,实际上就完成了对所关联的PhoneWindow的ViewTree的设置
- 我们还可以通过Activity类的requestWindowFeature()方法来定制Activity关联PhoneWindow的外观,这个方法实际上做的是把我们所请求的窗口外观特性存储到了PhoneWindow的mFeatures成员中,在窗口绘制阶段生成外观模板时,会根据mFeatures的值绘制特定外观
简而言之,PhoneWindow类是主要功能是:把一个FrameLayout类即DecorView对象进行一定的包装,将它作为应用窗口的根View,并提供一组通用的窗口操作接口。
- public class PhoneWindow extends Window implements MenuBuilder.Callback {
- //...
- // This is the top-level view of the window, containing the window decor.
- private DecorView mDecor; //该对象是所有应用窗口的根视图 , 是FrameLayout的子类
- //该对象是Activity布局文件的父视图,一般来说是一个FrameLayout型的ViewGroup
- // 是DecorView的子布局mContentRoot中的子布局,也就是DecorView孙子节点
- private ViewGroup mContentParent;
- //设置标题
- @Override
- public void setTitle(CharSequence title) {
- if (mTitleView != null) {
- mTitleView.setText(title);
- }
- mTitle = title;
- }
- //设置背景图片
- @Override
- public final void setBackgroundDrawable(Drawable drawable) {
- if (drawable != mBackgroundDrawable || mBackgroundResource != 0) {
- mBackgroundResource = 0;
- mBackgroundDrawable = drawable;
- if (mDecor != null) {
- mDecor.setWindowBackground(drawable);
- }
- }
- }
- //...
- }
二、setContentView过程
在分析setContentView()方法前,我们需要明确:这个方法只是完成了Activity的ContentView的创建,而并没有执行View的绘制流程
【1】当我们自定义Activity继承自android.app.Activity时候,调用的setContentView()方法是Activity类的,源码如下:
- public void setContentView(@LayoutRes int layoutResID) {
- getWindow().setContentView(layoutResID);
- . . .
- }
【2】 getWindow()方法会返回Activity所关联的PhoneWindow,也就是说,实际上调用到了PhoneWindow的setContentView()方法,源码如下:
- @Override public void setContentView(int layoutResID) {
- if (mContentParent == null) {
- // 【2.1】mContentParent即为上面提到的ContentView,若为空则调用installDecor()生成
- installDecor();
- } else if (!hasFeature(FEATURE_CONTENT_TRANSITIONS)) {
- // 具有FEATURE_CONTENT_TRANSITIONS特性表示开启了Transition
- // mContentParent不为null,则移除decorView的所有子View
- mContentParent.removeAllViews();
- }
- if (hasFeature(FEATURE_CONTENT_TRANSITIONS)) {
- // 开启了Transition,做相应的处理,我们不讨论这种情况
- // 感兴趣的同学可以参考源码
- ...
- } else {
- // 【2.2】一般情况会来到这里,调用mLayoutInflater.inflate()方法来填充布局
- // 填充布局也就是把我们设置的ContentView加入到mContentParent中
- mLayoutInflater.inflate(layoutResID, mContentParent);
- }...
- // cb即为该Window所关联的Activity
- final Callback cb = getCallback();
- if (cb != null && !isDestroyed()) {
- // 调用onContentChanged()回调方法通知Activity窗口内容发生了改变
- cb.onContentChanged();
- }
- ...
- }
【3】PhoneWindow的setContentView()方法中调用了LayoutInflater的inflate()方法来填充布局,并传入了 实际布局父容器ContentView(FrameLayout,contentParent , android.R.id.content)
- public View inflate(@LayoutRes int resource, @Nullable ViewGroup root) {
- return inflate(resource, root, root != null);
- }
- public View inflate(@LayoutRes int resource, @Nullable ViewGroup root, boolean attachToRoot) {
- final Resources res = getContext().getResources();
- . . .
- final XmlResourceParser parser = res.getLayout(resource);
- try {
- return inflate(parser, root, attachToRoot);
- } finally {
- parser.close();
- }
- }
【4】 在PhoneWindow的setContentView()方法中传入了ContentView作为LayoutInflater.inflate()的root参数,我们可以看到,通过层层调用,最终调用的是inflate(XmlPullParser, ViewGroup, boolean)方法来填充布局。这个方法的源码如下:
- public View inflate(XmlPullParser parser, @Nullable ViewGroup root, boolean attachToRoot) {
- synchronized (mConstructorArgs) {
- . . .
- final Context inflaterContext = mContext;
- final AttributeSet attrs = Xml.asAttributeSet(parser);
- Context lastContext = (Context) mConstructorArgs[0];
- mConstructorArgs[0] = inflaterContext;
- View result = root;
- try {
- // Look for the root node.
- int type;
- // 【4.1】一直读取xml文件,直到遇到开始标记
- while ((type = parser.next()) != XmlPullParser.START_TAG &&
- type != XmlPullParser.END_DOCUMENT) {
- // Empty
- }
- // 【4.2】最先遇到的不是开始标记,报错
- if (type != XmlPullParser.START_TAG) {
- throw new InflateException(parser.getPositionDescription()
- + ": No start tag found!");
- }
- final String name = parser.getName();
- . . .
- // 【4.3】单独处理<merge>标签,不熟悉的同学请参考官方文档的说明
- if (TAG_MERGE.equals(name)) {
- // 若包含<merge>标签,父容器(即root参数)不可为空且attachRoot须为true,否则报错
- if (root == null || !attachToRoot) {
- throw new InflateException("<merge /> can be used only with a valid "
- + "ViewGroup root and attachToRoot=true");
- }
- //【4.3.1】 递归地填充布局
- rInflate(parser, root, inflaterContext, attrs, false);
- } else {
- // temp为xml布局文件的根View
- final View temp = createViewFromTag(root, name, inflaterContext, attrs);
- ViewGroup.LayoutParams params = null;
- if (root != null) {
- . . .
- // 获取父容器的布局参数(LayoutParams)
- params = root.generateLayoutParams(attrs);
- if (!attachToRoot) {
- // 若attachToRoot参数为false,则我们只会将父容器的布局参数设置给根View
- temp.setLayoutParams(params);
- }
- }
- // 【4.4】递归加载根View的所有子View
- rInflateChildren(parser, temp, attrs, true);
- . . .
- if (root != null && attachToRoot) {
- // 若父容器不为空且attachToRoot为true,则将父容器作为根View的父View包裹上来
- root.addView(temp, params);
- }
- // 若root为空或是attachToRoot为false,则以根View作为返回值
- if (root == null || !attachToRoot) {
- result = temp;
- }
- }
- } catch (XmlPullParserException e) {
- . . .
- } catch (Exception e) {
- . . .
- } finally {
- . . .
- }
- return result;
- }
- }
【5】 上面的inflate()和rInflate()方法中都调用了rInflateChildren()方法,rInflateChildren()方法实际上调用了rInflate()方法,这个方法的源码如下:
- final void rInflateChildren(XmlPullParser parser, View parent, AttributeSet attrs, boolean finishInflate) throws XmlPullParserException, IOException {
- rInflate(parser, parent, parent.getContext(), attrs, finishInflate);
- }
我们讲一下:调用rInflate()方法来递归填充布局:
- void rInflate(XmlPullParser parser, View parent, Context context, AttributeSet attrs, boolean finishInflate) throws XmlPullParserException,
- IOException {
- // 获取当前标记的深度,根标记的深度为0
- final int depth = parser.getDepth();
- int type;
- while (((type = parser.next()) != XmlPullParser.END_TAG || parser.getDepth() > depth) && type != XmlPullParser.END_DOCUMENT) {
- // 不是开始标记则继续下一次迭代
- if (type != XmlPullParser.START_TAG) {
- continue;
- }
- final String name = parser.getName();
- // 对一些特殊标记做单独处理
- if (TAG_REQUEST_FOCUS.equals(name)) {
- parseRequestFocus(parser, parent);
- } else if (TAG_TAG.equals(name)) {
- parseViewTag(parser, parent, attrs);
- } else if (TAG_INCLUDE.equals(name)) {
- if (parser.getDepth() == 0) {
- throw new InflateException("<include /> cannot be the root element");
- }
- // 对<include>做处理
- parseInclude(parser, context, parent, attrs);
- } else if (TAG_MERGE.equals(name)) {
- throw new InflateException("<merge /> must be the root element");
- } else {
- // 对一般标记的处理
- final View view = createViewFromTag(parent, name, context, attrs);
- final ViewGroup viewGroup = (ViewGroup) parent;
- final ViewGroup.LayoutParams params = viewGroup.generateLayoutParams(attrs);
- // 递归地加载子View
- rInflateChildren(parser, view, attrs, true);
- viewGroup.addView(view, params);
- }
- }
- if (finishInflate) {
- parent.onFinishInflate();
- }
- }
到此,整个setContentView基本上已经完成,但是这时,我们的View还是不可见的,因为我们仅仅是加载了布局,并没有对View进行任何的测量、布局、绘制工作。
以下为分支逻辑
在这里,我们把 PhoneWindow中的mDecor和mContentParent的实例化过程,也就是【2.1】PhoneWindow#installDecor过程,也研究下,方便大家对mDecor和mContentParent有个直观的认识
- private void installDecor() {
- if (mDecor == null) {
- mDecor = generateDecor(); // 【2.1.1】生成mDecor
- mDecor.setDescendantFocusability(ViewGroup.FOCUS_AFTER_DESCENDANTS);
- mDecor.setIsRootNamespace(true);
- if (!mInvalidatePanelMenuPosted && mInvalidatePanelMenuFeatures != 0) {
- mDecor.postOnAnimation(mInvalidatePanelMenuRunnable);
- }
- }
- if (mContentParent == null) {
- mContentParent = generateLayout(mDecor); //【2.1.2】传入mDecor,并生成mContentParent
- ...
- }
- }
- }
首先,会执行【2.1.1】生成mDecor代码,调用PhoneWindow#generateDecor方法,就是例化了DecorView,是整个ViewTree的最顶层View,它是一个FrameLayout布局,代表了整个应用的界面:
- protected DecorView generateDecor() {
- return new DecorView(getContext(), -1);
- }
之后会执行【2.1.2】传入mDecor,并生成mContentParent
- 【2.1.2.0】根据设置的主题样式来设置DecorView的风格,比如说有没有titlebar之类的
- 【2.1.2.1】 将系统预设布局实例化为mContentRoot ,并加入到mDecor中
- 【2.1.2.2】在mContentRoot中找到ID_ANDROID_CONTENT,并实例为mContentParent
由此,我们就到得到
- protected ViewGroup generateLayout(DecorView decor) {
- // Apply data from current theme.
- // 从主题文件中获取样式信息
- TypedArray a = getWindowStyle();
- ...
- //【2.1.2.0】根据设置的主题样式来设置DecorView的风格,比如说有没有titlebar之类的
- if (a.getBoolean(R.styleable.Window_windowNoTitle, false)) {
- requestFeature(FEATURE_NO_TITLE);
- } else if (a.getBoolean(R.styleable.Window_windowActionBar, false)) {
- // Don't allow an action bar if there is no title.
- requestFeature(FEATURE_ACTION_BAR);
- }
- if (...) {...
- }
- // Inflate the window decor.
- // 加载窗口布局
- int layoutResource;
- int features = getLocalFeatures();
- // System.out.println("Features: 0x" + Integer.toHexString(features));
- if ((features & (1 << FEATURE_SWIPE_TO_DISMISS)) != 0) {
- layoutResource = R.layout.screen_swipe_dismiss;
- } else if (...) {...
- }
- //【2.1.2.1】 将系统预设布局实例化为mContentRoot ,并加入到mDecor中
- View in =mLayoutInflater.inflate(layoutResource, null); //加载layoutResource
- decor.addView( in , new ViewGroup.LayoutParams(MATCH_PARENT, MATCH_PARENT)); //往DecorView中添加子View,即mContentParent
- mContentRoot = (ViewGroup) in ;
- //【2.1.2.2】在mContentRoot中找到ID_ANDROID_CONTENT,并实例为mContentParent
- ViewGroup contentParent = (ViewGroup) findViewById(ID_ANDROID_CONTENT);
- if (contentParent == null) {
- throw new RuntimeException("Window couldn't find content container view");
- }
- if ((features & (1 << FEATURE_INDETERMINATE_PROGRESS)) != 0) {
- ProgressBar progress = getCircularProgressBar(false);
- if (progress != null) {
- progress.setIndeterminate(true);
- }
- }
- if ((features & (1 << FEATURE_SWIPE_TO_DISMISS)) != 0) {
- registerSwipeCallbacks();
- }
- // Remaining setup -- of background and title -- that only applies
- // to top-level windows.
- ...
- return contentParent;
- }
三、View绘制前过程
通过setContentView方法,创建了DecorView和加载了我们提供的布局,但是这时,我们的View还是不可见的,因为我们仅仅是加载了布局,并没有对View进行任何的测量、布局、绘制工作。
在View进行测量流程之前,还要进行一个步骤,那就是把DecorView添加至window中,然后经过一系列过程触发ViewRootImpl#performTraversals方法,在该方法内部会正式开始测量、布局、绘制这三大流程
3.1 ViewRoot
在介绍View的绘制前,首先我们需要知道是谁负责执行View绘制的整个流程。实际上,View的绘制是由ViewRoot来负责的。每个应用程序窗口的decorView都有一个与之关联的ViewRoot对象,这种关联关系是由WindowManager来维护的。
那么decorView与ViewRoot的关联关系是在什么时候建立的呢?答案是Activity启动时,ActivityThread.handleResumeActivity()方法中建立了它们两者的关联关系。
首先,我们要简单了解下Activity的创建过程(不太清楚的自行百度):
【步骤1】 在ActivityThread#handleLaunchActivity中启动Activity,在这里面会调用到Activity#onCreate方法,里边会有SetContentView()过程,从而完成上面所述的DecorView创建动作
【步骤2】 当onCreate()方法执行完毕,在handleLaunchActivity方法会继续调用到ActivityThread#handleResumeActivity方法
- final void handleResumeActivity(IBinder token, boolean clearHide, boolean isForward) {
- //...
- ActivityClientRecord r = performResumeActivity(token, clearHide); // **这里会调用到onResume()方法**
- if (r != null) {
- final Activity a = r.activity;
- //...
- if (r.window == null && !a.mFinished && willBeVisible) {
- r.window = r.activity.getWindow(); // 获得window对象
- View decor = r.window.getDecorView(); // 获得DecorView对象
- decor.setVisibility(View.INVISIBLE);
- ViewManager wm = a.getWindowManager(); // 获得windowManager对象
- WindowManager.LayoutParams l = r.window.getAttributes();
- a.mDecor = decor;
- l.type = WindowManager.LayoutParams.TYPE_BASE_APPLICATION;
- l.softInputMode |= forwardBit;
- if (a.mVisibleFromClient) {
- a.mWindowAdded = true;
- wm.addView(decor, l); // 调用addView方法
- }
- //...
- }
- }
- }
在该方法内部,获取该activity所关联的window对象,DecorView对象,以及windowManager对象,并调用WindowManager的addView方法。 注意在addView之前,会执行performResumeActivity,此时会调用Activity的onResume()生命周期函数
【步骤3】 WindowManager是抽象类,它的实现类是WindowManagerImpl,所以后面调用的是WindowManagerImpl#addView方法
- public final class WindowManagerImpl implements WindowManager {
- private final WindowManagerGlobal mGlobal = WindowManagerGlobal.getInstance();
- ...
- @Override
- public void addView(View view, ViewGroup.LayoutParams params) {
- mGlobal.addView(view, params, mDisplay, mParentWindow);
- }
- }
【步骤4】实际上调用了mGlobal的成员函数,而mGlobal则是WindowManagerGlobal的一个实例,那么我们接着看WindowManagerGlobal#addView方法
- public void addView(View view, ViewGroup.LayoutParams params,
- Display display, Window parentWindow) {
- ...
- ViewRootImpl root;
- View panelParentView = null;
- synchronized (mLock) {
- ...
- root = new ViewRootImpl(view.getContext(), display); // 【4.1】实例化了ViewRootImpl类
- view.setLayoutParams(wparams);
- mViews.add(view);
- mRoots.add(root);
- mParams.add(wparams);
- }
- // do this last because it fires off messages to start doing things
- try {
- root.setView(view, wparams, panelParentView); // 【4.2】调用ViewRootImpl#setView方法,并把DecorView作为参数传递进去
- } catch (RuntimeException e) {
- // BadTokenException or InvalidDisplayException, clean up.
- synchronized (mLock) {
- final int index = findViewLocked(view, false);
- if (index >= 0) {
- removeViewLocked(index, true);
- }
- }
- throw e;
- }
- }
【步骤5】在【4.2】ViewRootImpl.setView()函数中,ViewRootImpl、DecorView和WMS会彼此关联,最后通过WMS调用ViewRootImpl#requestLayout方法开始View的测量、布局、绘制流程
3.2 View绘制的起点
当建立好了decorView与ViewRoot的关联后,ViewRoot类的requestLayout()方法会被调用,以完成应用程序用户界面的初次布局。实际被调用的是ViewRootImpl类的requestLayout()方法,这个方法的源码如下:
- @Override
- public void requestLayout() {
- if (!mHandlingLayoutInLayoutRequest) {
- // 检查发起布局请求的线程是否为主线程
- checkThread();
- mLayoutRequested = true;
- scheduleTraversals();
- }
- }
上面的方法中调用了scheduleTraversals()方法来调度一次完成的绘制流程,该方法会向主线程发送一个“遍历”消息,最终会导致ViewRootImpl#performTraversals()方法被调用。
我们以ViewRootImpl#performTraversals()为起点,来分析View的整个绘制流程。
- private void performTraversals() {
- ...
- if (!mStopped) {
- int childWidthMeasureSpec = getRootMeasureSpec(mWidth, lp.width); // 1
- int childHeightMeasureSpec = getRootMeasureSpec(mHeight, lp.height);
- performMeasure(childWidthMeasureSpec, childHeightMeasureSpec);
- }
- }
- if (didLayout) {
- performLayout(lp, desiredWindowWidth, desiredWindowHeight);
- ...
- }
- if (!cancelDraw && !newSurface) {
- if (!skipDraw || mReportNextDraw) {
- if (mPendingTransitions != null && mPendingTransitions.size() > 0) {
- for (int i = 0; i < mPendingTransitions.size(); ++i) {
- mPendingTransitions.get(i).startChangingAnimations();
- }
- mPendingTransitions.clear();
- }
- performDraw();
- }
- }
- ...
- }
方法非常长,这里做了精简,我们看到它里面主要执行了三个方法,分别是performMeasure、performLayout、performDraw这三个方法,在这三个方法内部又会分别调用measure、layout、draw这三个方法来进行不同的流程,里边会调用我们最常接触的 onMeasure、onLayout、onDraw
我们接下来一一进行分析:
四、 View绘制
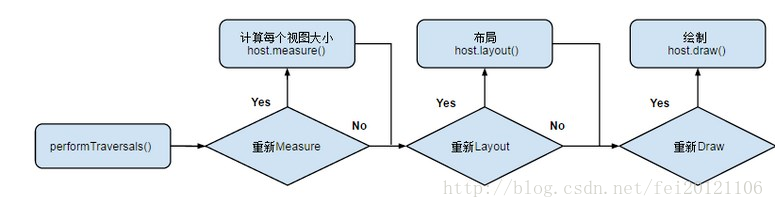
View的整个绘制流程可以分为以下三个阶段:
- measure: 判断是否需要重新计算View的大小,需要的话则计算;
- 为整个ViewTree计算出每个控件的实际的大小(该实际大小一般满足计划宽高,否则导致绘制不显示),以便在layout阶段进行全局的放置 和 draw阶段进行绘制绘制
- layout: 判断是否需要重新计算View的位置,需要的话则计算;
- 根据measure测量的实际大小,放置每一个View
- draw: 判断是否需要重新绘制View,需要的话则重绘制。
4.1 测量measure阶段
- 搞清楚父布局给定的计划宽高和自己要求的实际测量宽高的概念
- 有一个关于ViewTree的递归测量概念:通过在onMeasure中调用Child.measure启动递归过程
在该阶段中,需要为整个ViewTree计算出每个控件的实际的大小,以便在layout阶段进行全局的放置 和 draw阶段进行绘制绘制,即设置实际的高(对应属性:mMeasuredHeight)和宽(对应属性:mMeasureWidth),每个View的控件的实际测量宽高都是由父视图和本身视图决定的
在开始讲解该阶段前,我们还是先初步了解下我们在重写控件(View or ViewGroup)中相关的知识点,我们带着疑问去了解 Android的整体绘制过程可能会更清晰,当然如果你现在并不了解控件Measure过程,也可以继续读下去,有疑问以后再解答
4.1.1 重写View和ViewGroup时的Measur过程
我们在通过重写View or ViewGroup实现自定义控件的时候,第一个被告知的概念就是 当前控件的实际测量宽高是由父控件和自己配置参数共同决定的,这个机制的实现主要是通过,重写OnMeasure方法实现的:
- 重写onMeasure(int widthMeasureSpec, int heightMeasureSpec)方法,输入参数为 (父布局结合父布局条件 + 当前控件自己配置的参数)所共同产生的计划宽高
- 这个方法会有默认实现View#onMeasure,直接把父布局的计划属性的最大限制setMeasuredDimension返回,我们在4.1.2中讲解
- 重写View可以不重新该函数,会使用默认效果match_parent,具体分析见后文;实际上,应该也重写,并根据 计划宽高 得出自己期望的实际测量宽高
- 【1】在方法onMeasure中调用setMeasuredDimension(int measuredWidth, int measuredHeight)方法,告知父布局并全局存储自己要求的实际测量宽高
- 在onMeasure(int, int)中,**必须调用**setMeasuredDimension(int width, int height)来存储测量得到的宽度和高度值,如果没有这么去做会触发异常IllegalStateException
- setMeasuredDimension的最终值,应该考虑到:当前布局的padding 和 子控件的margin (自己的ondraw时和自己的onLayout调用child.layout时,也都要考虑child.margin 和 自己的padding)
- 对于ViewGroup还需要,【2】在方法onMeasure中为(2.1)每个子控件计算出计划宽高,并(2.2)调用所有子控件的View.measure(int widthMeasureSpec, int heightMeasureSpec)方法,从而实现整个ViewTree的迭代测量过程
- View.measure会调用View的onMeasure方法,而view的测量工作在onMeasure(int, int)方法中完成
- 子控件的View.measure所传入的计划宽高 = (当前padding + 子View的marging + 被其他子控件占用的宽高) 与 (当前布局的父布局给当前布局的计划宽高)与(子控件配置的android:widht,height属性)的分析与取舍,ViewGroup#measureChildWithMargins是系统实现
- ViewGroup#getChildMeasureSpec 是4.1.1.1的具体算法实现
- @Override protected void onMeasure(int widthMeasureSpec, int heightMeasureSpec) {
- //【1】如果该View是ViewGroup类型,则对它的每个子View进行measure()过程
- // 声明临时变量存储子控件的期望值
- int childDesireWidth = 0;
- int childDesireHeight = 0;
- if (getChildCount() > 0) {
- // 【1.1】那么遍历子元素并对其进行测量
- for (int i = 0; i < getChildCount(); i++) {
- // 获得每个子View对象引用
- View child = getChildAt(i);
- int childWidthSpec,
- childHeightSpec;
- int childWidthSize,
- childWidthMode,
- childHeightSize,
- childHeightMode;
- // 获取子元素的布局参数
- CustomLayoutParams clp = (CustomLayoutParams) child.getLayoutParams();
- //子View的计划宽高计算和传入实际测量;计划宽高 = (当前padding + 子View的marging + 被其他子控件占用的宽高) 与 (当前布局的父布局给当前布局的计划宽高)与(子控件配置的android:widht,height属性)的分析与取舍,具体看4.1.2.1
- measureChildWithMargins(child, widthMeasureSpec, 0, heightMeasureSpec, 0);
- //其实,对于我们自己写的应用来说,最好的办法是去掉框架里的该方法,直接调用view.measure(),需要尤其注意的就是calculateChildState,第一个重点在于也应该考虑以上元素,第二个重点在于取舍,也就是4.1.1.1的落实
- //childWidthSpec = calculateChildState(widthMeasureSpec,clp);
- //childHeightSpec = calculateHeightState(heightMeasureSpec,clp);
- //child.measure(h, l)
- // 计算父容器的期望值
- parentDesireWidth += child.getMeasuredWidth() + clp.leftMargin + clp.rightMargin;
- parentDesireHeight += child.getMeasuredHeight() + clp.topMargin + clp.bottomMargin;
- }
- // 【1.2】考虑当前的内边距
- parentDesireWidth += getPaddingLeft() + getPaddingRight();
- parentDesireHeight += getPaddingTop() + getPaddingBottom();
- // 【1.3】尝试比较建议最小值和期望值的大小并取大值
- parentDesireWidth = Math.max(parentDesireWidth, getSuggestedMinimumWidth());
- parentDesireHeight = Math.max(parentDesireHeight, getSuggestedMinimumHeight());
- }
- // 【2】设置最终测量值,该view的实际宽(mMeasuredWidth)高(mMeasuredHeight)
- setMeasuredDimension(resolveSize(parentDesireWidth, widthMeasureSpec), resolveSize(parentDesireHeight, heightMeasureSpec));
- }
- //该方法具体实现在ViewGroup.java里 。
- protected void measureChildWithMargins(View v, int height, int width) {
- v.measure(h, l)
- }
4.1.1.1 onMeasure中的参数: 计划宽高的生成规则
MeasureSpec对象包含一个size和一个mode,其中mode可以取以下三个数值之一:
- UNSPECIFIED,1073741824 [0x40000000],未加规定的,表示没有给子view添加任何规定。
- EXACTLY,0 [0x0],精确的,表示父view为子view确定精确的尺寸。
- AT_MOST,-2147483648 [0x80000000],子view可以在指定的尺寸内尽量大
- void onMeasure(int widthMeasureSpec, int heightMeasureSpec)
输入参数为已经生成好计划宽高,也就是说父布局告诉当前控件:老爸能支持你的最大宽高或准确宽高是这些,具体你想要多少宽高,你自己setMeasuredDimension说了算;在我的额度内,我一定给你批款,但是超过我给的额度了,显示不显示那就不好说了
在重写该方法的时候,我们应该 为子控件生成该计划宽高
需要说明的一点是:
- 下表中应该有 3*3=9中可能,在android中已经有ViewGroup#getChildMeasureSpec帮我们实现。当然,具体的导出结果我们也可以完全根据自己的业务规则来的,自己重新定义,但是我们一般遵循变量的字面意思,所以会有一般的生成方式。
- 下表中未考量已占用部分:padding,child.margin,其他子控件已占用。该表主要做逻辑示意
- 下表是站在 父布局角度,生成子布局的计划宽高
| 子控件配置的android:width,android:height | 顺解 | 父布局给当前布局设定的计划宽高状况 | 示意 | widthMeasureSpec,heightMeasureSpec |
|---|---|---|---|---|
| 一个具体的值( android:width = 500 dp) | EXACTLY + childvalue | |||
| MATCH_PARENT | 子控件应该是父布局的准确大小+EXACTLY ,但是由于当前布局计划宽高的不确定性,那么传入的值就分以下几种情况 | 一个确定的值 EXACTLY | 当前布局的大小是被确定的,所以子元素大小也是可以被确定的 | 直接将当前布局的计划宽高大小作为输入EXACTLY + parentvalue |
| 总体遵循,当前的计划宽高如何,子控件就咋样 | 一个限制值的值 AT_MOST | 当前布局的大小是受到限制值的限制,所以子元素的大小也应该受到当前容器的限制 | 将当前布局的计划宽高大小作为参考 AT_MOST + parentvalue | |
| 当前布局尺寸大小未受限制 并且未定义 | 当前布局的大小不受限制,而对子元素来说也可以是任意大小,所以不指定也不限制子元素的大小 | 不指定大小 UNSPECIFIED + 0 | ||
| WRAP_CONTENT | 当前控件应该是<=父布局的准确大小At_Most,但是由于父控件宽高不确定性,那么传入的值就分以下几种情况 | 一个确定的值 EXACTLY | 子元素的大小包裹了其内容后不能超过当前布局 | 将当前布局的计划宽高大小作为参考 AT_MOST + parentvalue |
| 总体遵循,当前布局计划宽高如何,子<=当前布局宽高 | 一个限制值的值 AT_MOST | 当前布局的大小是受到限制值的限制,所以子元素的大小也应该受到当前布局的限制 | 将当前布局的计划宽高大小作为参考 AT_MOST + parentvalue | |
| 当前布局尺寸大小未受限制 并且未定义 | 当前布局的大小不受限制而对子元素来说也可以是任意大小所以不指定也不限制子元素的大小 | 不指定大小 UNSPECIFIED + 0 |
我们可以看到,当前控件自己配置的参数android:width,height 并不能完全决定输入值widthMeasureSpec,heightMeasureSpec,因此我们在做自定义控件的时候, 一定要摆脱对wrap_content和match_parent的概念,只保留对Exact、At_Most和UNSPECIFIED的认知
4.1.1.2 setMeasuredDimension设置:自身实际测量宽高
- void android.view.View.setMeasuredDimension(int measuredWidth, int measuredHeight)
- 对于View而言
- 仅需要根据自身的业务要求,设置需要的大小即可(可以满足计划宽高,也可以完全不管,后者可能导致不显示)
譬如ImageView就返回图片需要的宽高,TextView就返回文本的宽高
- 仅需要根据自身的业务要求,设置需要的大小即可(可以满足计划宽高,也可以完全不管,后者可能导致不显示)
- 对于ViewGroup而言
- 一般需要先遍历调用子控件的宽高要求,并累计计算,在结合自身的业务要求,设置设置需要的大小即可(可以满足计划宽高,也可以完全不管,后者可能导致不显示)
4.1.2 measure过程
整个measure调用流程就是个树形的递归过程
我们开始从ViewRootImpl#performTraversals()开始看:
- private void performTraversals() {
- // ………省略宇宙尘埃数量那么多的代码………
- if (!mStopped) {
- // ……省略一些代码
- int childWidthMeasureSpec = getRootMeasureSpec(mWidth, lp.width);
- int childHeightMeasureSpec = getRootMeasureSpec(mHeight, lp.height);
- // ……省省省
- performMeasure(childWidthMeasureSpec, childHeightMeasureSpec);
- }
- // ………省略人体细胞数量那么多的代码………
- }
【步骤1】可以看到在performTraversals方法中通过getRootMeasureSpec获取原始的测量规格并将其作为参数传递给performMeasure方法处理,得到一个全屏的跟视图测量规格,其中输入参数lp.width和lp.height均为MATCH_PARENT,其在mWindowAttributes(WindowManager.LayoutParams类型)将值赋予给lp时就已被确定,mWidth和mHeight表示当前窗口的大小:
- private static int getRootMeasureSpec(int windowSize, int rootDimension) {
- int measureSpec;
- switch (rootDimension) {
- case ViewGroup.LayoutParams.MATCH_PARENT:
- // Window不能调整其大小,强制使根视图大小与Window一致
- measureSpec = MeasureSpec.makeMeasureSpec(windowSize, MeasureSpec.EXACTLY);
- break;
- case ViewGroup.LayoutParams.WRAP_CONTENT:
- // Window可以调整其大小,为根视图设置一个最大值
- measureSpec = MeasureSpec.makeMeasureSpec(windowSize, MeasureSpec.AT_MOST);
- break;
- default:
- // Window想要一个确定的尺寸,强制将根视图的尺寸作为其尺寸
- measureSpec = MeasureSpec.makeMeasureSpec(rootDimension, MeasureSpec.EXACTLY);
- break;
- }
- return measureSpec;
- }
通过代码我们可以看出,我们的根视图大小必定都是全屏的,至此,我们算是真正接触到根视图的测量规格,尔后这个规格会被由上至下传递下去,并由当前view与其父容器共同作用决定最终的测量大小
【步骤2】从mView(DecorView)开始,递归式调用measure()实现整体ViewTree的整体测量。
- private void performMeasure(int childWidthMeasureSpec, int childHeightMeasureSpec) {
- Trace.traceBegin(Trace.TRACE_TAG_VIEW, "measure");
- try {
- mView.measure(childWidthMeasureSpec, childHeightMeasureSpec);
- } finally {
- Trace.traceEnd(Trace.TRACE_TAG_VIEW);
- }
- }
由于PhoneWindow#DecorView继承自FrameLayout(未重写measure()), 继承自ViewGroupt(未重写measure()),继承自View,其实最终还是调用View#measure(int widthMeasureSpec, int heightMeasureSpec)方法。我们转来看该方法,其中当前的参数为全局屏幕大小规格:
- public final void measure(int widthMeasureSpec, int heightMeasureSpec) {
- // 省略部分代码……
- /*
- * 判断当前mPrivateFlags是否带有PFLAG_FORCE_LAYOUT强制布局标记 **比如调用View.requestLayout()会在mPrivateFlags中加入此标记**
- * 判断当前widthMeasureSpec和heightMeasureSpec是否发生了改变
- */
- if ((mPrivateFlags & PFLAG_FORCE_LAYOUT) == PFLAG_FORCE_LAYOUT ||
- widthMeasureSpec != mOldWidthMeasureSpec ||
- heightMeasureSpec != mOldHeightMeasureSpec) {
- // 如果发生了改变表示需要重新进行测量此时清除掉mPrivateFlags中已测量的标识位PFLAG_MEASURED_DIMENSION_SET
- mPrivateFlags &= ~PFLAG_MEASURED_DIMENSION_SET;
- resolveRtlPropertiesIfNeeded();
- int cacheIndex = (mPrivateFlags & PFLAG_FORCE_LAYOUT) == PFLAG_FORCE_LAYOUT ? -1 :
- mMeasureCache.indexOfKey(key);
- if (cacheIndex < 0 || sIgnoreMeasureCache) {
- //【步骤2.1】测量View的尺寸
- onMeasure(widthMeasureSpec, heightMeasureSpec);
- mPrivateFlags3 &= ~PFLAG3_MEASURE_NEEDED_BEFORE_LAYOUT;
- } else {
- long value = mMeasureCache.valueAt(cacheIndex);
- setMeasuredDimension((int) (value >> 32), (int) value);
- mPrivateFlags3 |= PFLAG3_MEASURE_NEEDED_BEFORE_LAYOUT;
- }
- /*
- * 如果mPrivateFlags里没有表示已测量的标识位PFLAG_MEASURED_DIMENSION_SET则会抛出异常
- */
- if ((mPrivateFlags & PFLAG_MEASURED_DIMENSION_SET) != PFLAG_MEASURED_DIMENSION_SET) {
- throw new IllegalStateException("onMeasure() did not set the"
- + " measured dimension by calling"
- + " setMeasuredDimension()");
- }
- // 如果已测量View那么就可以往mPrivateFlags添加标识位PFLAG_LAYOUT_REQUIRED表示可以进行布局了
- mPrivateFlags |= PFLAG_LAYOUT_REQUIRED;
- }
- // 【步骤2.2】最后存储测量完成的测量规格
- mOldWidthMeasureSpec = widthMeasureSpec;
- mOldHeightMeasureSpec = heightMeasureSpec;
- mMeasureCache.put(key, ((long) mMeasuredWidth) << 32 |
- (long) mMeasuredHeight & 0xffffffffL); // suppress sign extension
- }
【步骤3】在View#measure()内部调用了onMeasure方法,由于DecorView重写了该方法,因此它实际上调用的是DecorView#onMeasure方法。在该方法内部,主要是进行了一些判断,这里不展开来看了,到最后会调用到super.onMeasure方法,即FrameLayout#onMeasure方法。
由于不同的ViewGroup有着不同的性质,那么它们的onMeasure必然是不同的,因此这里不可能把所有布局方式的onMeasure方法都分析一遍,因此这里就按照当前进度涉及的FrameLayout的onMeasure方法来进行分析,其它的布局方式读者可以自行分析
- @Override
- protected void onMeasure(int widthMeasureSpec, int heightMeasureSpec) {
- //获取当前布局内的子View数量
- int count = getChildCount();
- int maxHeight = 0;
- int maxWidth = 0;
- int childState = 0;
- //遍历所有类型不为GONE的子View
- for (int i = 0; i < count; i++) {
- final View child = getChildAt(i);
- if (mMeasureAllChildren || child.getVisibility() != GONE) {
- //【步骤3.1】对每一个子View进行测量
- measureChildWithMargins(child, widthMeasureSpec, 0, heightMeasureSpec, 0);
- final LayoutParams lp = (LayoutParams) child.getLayoutParams();
- //【步骤3.2】寻找子View中宽高的最大者,因为如果FrameLayout是wrap_content属性
- //那么它的大小取决于子View中的最大者
- maxWidth = Math.max(maxWidth,
- child.getMeasuredWidth() + lp.leftMargin + lp.rightMargin);
- maxHeight = Math.max(maxHeight,
- child.getMeasuredHeight() + lp.topMargin + lp.bottomMargin);
- childState = combineMeasuredStates(childState, child.getMeasuredState());
- //如果FrameLayout是wrap_content模式,那么往mMatchParentChildren中添加宽或者高为match_parent的子View,因为该子View的最终测量大小会受到FrameLayout的最终测量大小影响
- if (measureMatchParentChildren) {
- if (lp.width == LayoutParams.MATCH_PARENT ||
- lp.height == LayoutParams.MATCH_PARENT) {
- mMatchParentChildren.add(child);
- }
- }
- }
- }
- // Account for padding too
- maxWidth += getPaddingLeftWithForeground() + getPaddingRightWithForeground();
- maxHeight += getPaddingTopWithForeground() + getPaddingBottomWithForeground();
- // Check against our minimum height and width
- maxHeight = Math.max(maxHeight, getSuggestedMinimumHeight());
- maxWidth = Math.max(maxWidth, getSuggestedMinimumWidth());
- // Check against our foreground's minimum height and width
- final Drawable drawable = getForeground();
- if (drawable != null) {
- maxHeight = Math.max(maxHeight, drawable.getMinimumHeight());
- maxWidth = Math.max(maxWidth, drawable.getMinimumWidth());
- }
- //【步骤3.3】保存测量结果
- setMeasuredDimension(resolveSizeAndState(maxWidth, widthMeasureSpec, childState),
- resolveSizeAndState(maxHeight, heightMeasureSpec,
- childState << MEASURED_HEIGHT_STATE_SHIFT));
- }
- private void setMeasuredDimensionRaw(int measuredWidth, int measuredHeight) {
- mMeasuredWidth = measuredWidth;
- mMeasuredHeight = measuredHeight;
- mPrivateFlags |= PFLAG_MEASURED_DIMENSION_SET;
- }
- 【步骤3.1】FrameLayout根据它的MeasureSpec来对每一个子View进行测量,即调用measureChildWithMargin方法,该方法会调用子控件的Measure
- 【步骤3.2】对于每一个测量完成的子View,通过getMeasureWidthHeight(),会寻找其中最大的宽高,那么FrameLayout的测量宽高会受到这个子View的最大宽高的影响(wrap_content模式)
- 【步骤3.3】调用setMeasureDimension方法,把FrameLayout的测量宽高保存
- 调用View#resolveSizeAndState分析孩子期望宽高 和 父亲计划宽高(这两个名词很熟悉吧,就是4.1.1.2中描述的业务需求的具体实现)
- 【步骤3.4】(代码中未列出,可查看这里)最后则是特殊情况的处理,即当FrameLayout为wrap_content属性时,如果其子View是match_parent属性的话,则要重新设置FrameLayout的测量规格,然后重新对该部分View测量
到此为止,整个测量过程其实已经完整的展示在我们面前:
- ViewRootImpl#performTraversals中获取当前的窗口的全屏尺寸,作为最顶级的计划宽高规格
- ViewRootImpl#performMeasure通过调用DectorView的measure(计划宽高作为参数),开始整个全局ViewTree的测量过程
-
final measure()函数不会被重写,最终调用的是View#measure(),其中会调用onMeasure(计划宽高),并将计算后的实际测量宽高mMeasuredWidth、mMeasuredHeight读到内存中
-
ViewGroup会在OnMeasure()中:
- (1)遍历子控件,考虑padding,child.margin,计划宽高及其已被占用部分作为参数,生成child的计划宽高,(2)调用子控件的measure(),迭代开始步骤3,这也是ViewGroup#measureChildWithMargins的过程
- 获取到子控件测量后的宽高,按照一定的业务需求,累积 子控件要求宽高,同时更新计划宽高被其他子控件占用的数值,以作为下次遍历的输入
- 遍历结束后,按照一定的业务需求,将子控件要求宽高 和 计划宽高 做一定的取舍,并通过调用setMeasuredDimension()设置为自己的宽高
- View会在OnMesure中,通过调用setMeasuredDimension()自己的宽高
-
ViewGroup会在OnMeasure()中:
以下为上述步骤中,涉及函数的解析
4.1.2.1 measureChildWithMargin方法
我们上面在FrameLayout测量内提到的measureChildWithMargin方法,它接收的主要参数是子View以及父容器的MeasureSpec,所以它的作用就是对子View进行测量,那么我们直接看这个方法,ViewGroup#measureChildWithMargins:
- /**
- * child: 当前布局的子控件
- * parentWidthMeasureSpec:当前布局的父布局给当前布局的计划宽高
- * widthUsed:已经被其他孩子使用的宽高
- */
- protected void measureChildWithMargins(View child,
- int parentWidthMeasureSpec, int widthUsed,
- int parentHeightMeasureSpec, int heightUsed) {
- final MarginLayoutParams lp = (MarginLayoutParams) child.getLayoutParams();
- //childWidthMeasureSpec ,childHeightMeasureSpec 就是当前布局为子布局混合的计划宽高
- final int childWidthMeasureSpec = getChildMeasureSpec(parentWidthMeasureSpec,
- mPaddingLeft + mPaddingRight + lp.leftMargin + lp.rightMargin
- + widthUsed, lp.width);
- final int childHeightMeasureSpec = getChildMeasureSpec(parentHeightMeasureSpec,
- mPaddingTop + mPaddingBottom + lp.topMargin + lp.bottomMargin
- + heightUsed, lp.height);
- child.measure(childWidthMeasureSpec, childHeightMeasureSpec); // 1
- }
【步骤1】childWidthMeasureSpec ,childHeightMeasureSpec 就是当前布局为子布局混合的计划宽高,由此我们有可以得知,ViewGroup#getChildMeasureSpec方法其实就是“4.1.1.1中描述的onMeasure中的参数: 计划宽高”的具体实现:
- /**
- *spec:当前布局的父布局给当前布局的计划宽高
- *padding:当前布局的padding + 子控件的margin + 被其他子控件占用的宽高
- *childDimension:子控件配置的android:widht,height属性
- */
- public static int getChildMeasureSpec(int spec, int padding, int childDimension) {
- int specMode = MeasureSpec.getMode(spec);
- int specSize = MeasureSpec.getSize(spec);
- //size表示子View可用空间:父容器尺寸减去padding
- int size = Math.max(0, specSize - padding);
- int resultSize = 0;
- int resultMode = 0;
- switch (specMode) {
- // Parent has imposed an exact size on us
- case MeasureSpec.EXACTLY:
- if (childDimension >= 0) {
- resultSize = childDimension;
- resultMode = MeasureSpec.EXACTLY;
- } else if (childDimension == LayoutParams.MATCH_PARENT) {
- // Child wants to be our size. So be it.
- resultSize = size;
- resultMode = MeasureSpec.EXACTLY;
- } else if (childDimension == LayoutParams.WRAP_CONTENT) {
- // Child wants to determine its own size. It can't be
- // bigger than us.
- resultSize = size;
- resultMode = MeasureSpec.AT_MOST;
- }
- break;
- // Parent has imposed a maximum size on us
- case MeasureSpec.AT_MOST:
- //省略..具体可自行参考源码
- break;
- // Parent asked to see how big we want to be
- case MeasureSpec.UNSPECIFIED:
- //省略...具体可自行参考源码
- break;
- }
- return MeasureSpec.makeMeasureSpec(resultSize, resultMode);
- }
| 子View的LayoutParams\父容器SpecMode | EXACTLY | AT_MOST | UNSPECIFIED |
|---|---|---|---|
| 精确值(dp) | EXACTLY childSize | EXACTLY childSize | EXACTLY childSize |
| match_parent | EXACTLY parentSize | AT_MOST parentSize | UNSPECIFIED 0 |
| wrap_content | AT_MOST parentSize | AT_MOST parentSize | UNSPECIFIED 0 |
【步骤2】当子View的MeasureSpec获得后,我们返回measureChildWithMargins方法,接着就会执行①号代码:child.measure方法,意味着,绘制流程已经从ViewGroup转移到子View中了,可以看到传递的参数正是我们刚才获取的子View的MeasureSpec,接着会调用View#measure,其中再次回调OnMeasure
4.1.2.1 resolveSizeAndState方法取舍孩子期望宽高和父亲计划宽高
- /**
- * View#resolveSizeAndState
- * 分析 孩子期望宽高 和 父亲计划宽高(这两个名词很熟悉吧,就是4.1.1.2中描述的业务需求的具体实现
- */
- public static int resolveSizeAndState(int size, int measureSpec, int childMeasuredState) {
- final int specMode = MeasureSpec.getMode(measureSpec);
- final int specSize = MeasureSpec.getSize(measureSpec);
- final int result;
- switch (specMode) {
- case MeasureSpec.AT_MOST:
- //计划宽高是个最大值要求
- if (specSize < size) { //子需要宽高 > 最大限制,按最大限制
- result = specSize | MEASURED_STATE_TOO_SMALL;
- } else { //子需要宽高 < 最大限制,按需要宽高
- result = size;
- }
- break;
- case MeasureSpec.EXACTLY:
- //计划宽高是个精确值,直接使用精确值
- result = specSize;
- break;
- case MeasureSpec.UNSPECIFIED:
- default:
- result = size;
- }
- return result | (childMeasuredState & MEASURED_STATE_MASK);
- }
4.1.2.3 View#onMeasure的默认实现
如果,我们不重新View的onMeasure会调用其默认实现,会出现什么呢? 还是从代码看吧:
- protected void onMeasure(int widthMeasureSpec, int heightMeasureSpec) {
- setMeasuredDimension(getDefaultSize(getSuggestedMinimumWidth(), widthMeasureSpec),
- getDefaultSize(getSuggestedMinimumHeight(), heightMeasureSpec));
- }
- /**
- *当View没有设置背景的时候,返回mMinWidth,该值对应于android:minWidth属性;如果设置了背景,那么返回mMinWidth和mBackground.getMinimumWidth(背景的原始宽度)中的最大值
- */
- protected int getSuggestedMinimumWidth() {
- return (mBackground == null) ? mMinWidth : max(mMinWidth, mBackground.getMinimumWidth());
- }
默认实现还是调用了setMeasuredDimension,传入了getDefaultSize的返回值,getDefaultSize的输入参数是:最小宽高,父布局的计划宽高
我们看看View#getDefaultSize,:
- public static int getDefaultSize(int size, int measureSpec) {
- int result = size;
- int specMode = MeasureSpec.getMode(measureSpec);
- int specSize = MeasureSpec.getSize(measureSpec);
- switch (specMode) {
- case MeasureSpec.UNSPECIFIED:
- result = size;
- break;
- case MeasureSpec.AT_MOST:
- case MeasureSpec.EXACTLY:
- result = specSize;
- break;
- }
- return result;
- }
很好理解:如果计划宽高是精确值EXACTLY或最大值AT_MOST,那么当前view的实际测量宽高就是该值;如果是无限制UNSPECIFIED,则按最小元素
这也说明了一个大家耳熟能详的道理:对于一个直接继承自View的自定义View来说,它的wrap_content和match_parent属性的效果是一样的,都是铺满父布局宽高,因此如果要实现自定义View的wrap_content,则要重写onMeasure方法,对wrap_content属性进行处理
4.2 布局layout阶段
- 理解 实际测量宽高 和 绘制宽高的概念,也就是getMeasuredHeight()与getHeight的区别
- 在进入measure阶段后,所有的View都已经存有自己的实际测量宽高
- 有一个关于ViewTree的递归测量概念:通过在onLayout中调用Child.layout启动递归过程
在该阶段中,得出每一个view的相对绘制位置矩阵(相对父布局的top,left,bottom,right),最终构成全局相对位置绘制树
在开始讲解该阶段前,我们还是按照之前的套路,先初步了解下我们在重写控件(View or ViewGroup)中相关的知识点
4.2.1 重写View或ViewGroup的onLayout()
- /**
- * @param changed 是否与上一次位置不同,其具体值在View的layout方法中通过setFrame等方法确定
- * @param l 四个参数则表示当前View与父容器的相对距离
- * @param t 四个参数则表示当前View与父容器的相对距离
- * @param r 四个参数则表示当前View与父容器的相对距离
- * @param b 四个参数则表示当前View与父容器的相对距离
- */
- void onLayout(boolean changed, int l, int t, int r, int b) {
onLayoutLayout的目的是为了确定子元素 在父容器中的位置,那么这个步骤理应该由父容器来决定而不是子元素,因此,我们可以猜到View中的onLayout方法应该是一个空实现,但是要注意一点无论View和Viewgroup都应该在layout中考虑自己的padding,当然ViewGroup还要考虑child.margin
接下来我们就之讨论ViewGroup的onLayout重写方法,给一个简单的示例看一下吧:
- protected void onLayout(boolean changed, int l, int t, int r, int b) {
- // 获取当前容器内边距
- int parentPaddingLeft = getPaddingLeft();
- int parentPaddingTop = getPaddingTop();
- if (getChildCount() > 0) {
- // 声明一个临时变量存储高度倍增值,已占用的高度
- int mutilHeight = 0;
- // 那么遍历子元素并对其进行定位布局
- for (int i = 0; i < getChildCount(); i++) {
- View child = getChildAt(i);
- //考虑自身padding,按照当前的测量宽高,简单的垂直分布所有子控件
- //对比和下边的区别 这行代码 是每个子view 的layout大小都按照 当前布局的底端为底端,并没有按照子view实际需要的
- //child.layout(parentPaddingLeft, mutilHeight + parentPaddingTop , getMeasuredWidth() + parentPaddingLeft, getMeasuredHeight() + mutilHeight + parentPaddingTop);
- //考虑自身padding,按照子控件宽高要求,垂直分布所有子控件
- //child.layout(parentPaddingLeft, mutilHeight + parentPaddingTop , child.getMeasuredWidth() + parentPaddingLeft, child.getMeasuredHeight() + mutilHeight + parentPaddingTop);
- //考虑自身padding和子元素margin,按照子控件宽高要求,垂直分布所有子控件
- CustomLayoutParams clp = (CustomLayoutParams) child.getLayoutParams();
- child.layout(parentPaddingLeft + clp.leftMargin, mutilHeight + parentPaddingTop + clp.topMargin, child.getMeasuredWidth() + parentPaddingLeft + clp.leftMargin, child.getMeasuredHeight() + mutilHeight + parentPaddingTop + clp.topMargin);
- // 改变高度倍增值
- mutilHeight += child.getMeasuredHeight();
- }
- }
- }
我们可以看出Layout中的逻辑其实是很简单的:
-
遍历所有子控件:
- 为当前遍历的子控件计算绘制区域(坐标相对于当前布局的左上点),需要考量:当前padding+child.margin+已累积部分
- 调用child.layout(),将绘制区域赋值给当前遍历的子控件,开启迭代过程
- 更新已累计部分
以上给出的onlayout的例子其实很简单,但是有一点我们一定要注意到:从本质上来讲,当前布局的onLayout中的参数是当前布局在其父布局中的相对位置,这些left|top|bottom|right一般不会去影响当前布局的子控件,也就是说这些参数在逻辑上其实是应该不会影响child.layout()中参数的计算,这也说明了left|top|bottom|right的隔离效果:子控件相对父布局,父布局只管直系子控件
如果你说:既然这四个参数没啥用,那为什么还要传递进来呢? 注意我们上文说的是,逻辑上无关联,主要是为了便于理解;实际上,在承担一些业务逻辑的时候,还是需要这几个参数的。譬如,你如果计算从左上角开始从上向下布局子元素,的确用不到;但如果是从右上角开始呢?这就需要知道当前布局的位置属性啦,这也是FrameLayout的过程,具体看下文
4.2.2 layout过程
我们基本可以认为VieRootImpl#performLayout是整个layout过程的起点,我们先看它的源码:
- private void performLayout(WindowManager.LayoutParams lp, int desiredWindowWidth,
- int desiredWindowHeight) {
- mLayoutRequested = false;
- mScrollMayChange = true;
- mInLayout = true;
- final View host = mView;
- if (DEBUG_ORIENTATION || DEBUG_LAYOUT) {
- Log.v(TAG, "Laying out " + host + " to (" +
- host.getMeasuredWidth() + ", " + host.getMeasuredHeight() + ")");
- }
- Trace.traceBegin(Trace.TRACE_TAG_VIEW, "layout");
- try {
- host.layout(0, 0, host.getMeasuredWidth(), host.getMeasuredHeight()); // 1
- //省略...
- } finally {
- Trace.traceEnd(Trace.TRACE_TAG_VIEW);
- }
- mInLayout = false;
- }
我们主要要关注的就是这行代码:host.layout(0, 0, host.getMeasuredWidth(), host.getMeasuredHeight());,其中host就是DecorView,【步骤1】调用DecorView的layout方法,并传入DecorView的实际测量宽高,在测量阶段我们就已经知道了 DecorView继承自FrameLayout继承自ViewGroup继承自View,实际上调用的还是【步骤2】View#layout,这是个final方法:
- public void layout(int l, int t, int r, int b) {
- if ((mPrivateFlags3 & PFLAG3_MEASURE_NEEDED_BEFORE_LAYOUT) != 0) {
- onMeasure(mOldWidthMeasureSpec, mOldHeightMeasureSpec);
- mPrivateFlags3 &= ~PFLAG3_MEASURE_NEEDED_BEFORE_LAYOUT;
- }
- int oldL = mLeft;
- int oldT = mTop;
- int oldB = mBottom;
- int oldR = mRight;
- boolean changed = isLayoutModeOptical(mParent) ?
- setOpticalFrame(l, t, r, b) : setFrame(l, t, r, b); // 2.1
- if (changed || (mPrivateFlags & PFLAG_LAYOUT_REQUIRED) == PFLAG_LAYOUT_REQUIRED) {
- onLayout(changed, l, t, r, b); // 2.2
- mPrivateFlags &= ~PFLAG_LAYOUT_REQUIRED;
- ListenerInfo li = mListenerInfo;
- if (li != null && li.mOnLayoutChangeListeners != null) {
- ArrayList<OnLayoutChangeListener> listenersCopy =
- (ArrayList<OnLayoutChangeListener>)li.mOnLayoutChangeListeners.clone();
- int numListeners = listenersCopy.size();
- for (int i = 0; i < numListeners; ++i) {
- listenersCopy.get(i).onLayoutChange(this, l, t, r, b, oldL, oldT, oldR, oldB);
- }
- }
- }
- mPrivateFlags &= ~PFLAG_FORCE_LAYOUT;
- mPrivateFlags3 |= PFLAG3_IS_LAID_OUT;
- }
先看【步骤2.1】调用了setFrame方法,并把四个位置信息传递进去,这个方法用于确定当前控件的四个顶点的位置,即初始化mLeft,mRight,mTop,mBottom这四个值,当初始化完毕后,当前控件自身位置就会被确定
- protected boolean setFrame(int left, int top, int right, int bottom) {
- //省略...
- mLeft = left;
- mTop = top;
- mRight = right;
- mBottom = bottom;
- mRenderNode.setLeftTopRightBottom(mLeft, mTop, mRight, mBottom);
- boolean sizeChanged = (newWidth != oldWidth) || (newHeight != oldHeight);
- if (sizeChanged) {
- if ((mPrivateFlags & PIVOT_EXPLICITLY_SET) == 0) {
- // A change in dimension means an auto-centered pivot point changes, too
- if (mTransformationInfo != null) {
- mTransformationInfo.mMatrixDirty = true;
- }
- }
- onSizeChanged(newWidth, newHeight, oldWidth, oldHeight);
- }
- //省略...
- return changed;
- }
对于每一个View,包括ViewGroup来说,以上四个值保存了Viwe的位置信息,所以这四个值是最终宽高。
也即是说,如果要得到View的位置信息,那么就应该在layout方法完成后调用getLeft()、getTop()等方法来取得最终宽高;如果是在此之前调用相应的方法,只能得到0的结果,所以一般我们是在onLayout方法中获取View的宽高信息
有兴趣的可以看下这篇文章 getMeasuredHeight()与getHeight的区别
注意到:在setFrame中时,如果布局位置有发生变化,会回调onSizeChanged(),因此我们可以得知:
- onSizeChanged的回调时机是在layout阶段
- 只会在发生变化时触发
因此,我们往往在 onSizeChanged确定控件的绘制宽高
【步骤2.2】会调用onLayout()方法,该方法在View中是一个空实现,在ViewGroup中用于确定子View的位置,即在该方法内部,子View会调用自身的layout方法来进一步完成自身的布局流程。由于不同的布局容器的onLayout方法均有不同的实现,因此不可能对所有布局方式都说一次,另外上一篇文章是用FrameLayout#onMeasure进行讲解的,那么现在也对FrameLayout#onLayout方法进行讲解:
- @Override protected void onLayout(boolean changed, int left, int top, int right, int bottom) {
- //把父容器的位置参数传递进去
- layoutChildren(left, top, right, bottom, false
- /* no force left gravity */
- );
- }
- void layoutChildren(int left, int top, int right, int bottom, boolean forceLeftGravity) {
- final int count = getChildCount();
- //以下四个值会影响到子View的布局参数
- //parentLeft由父容器的padding和Foreground决定
- final int parentLeft = getPaddingLeftWithForeground();
- //parentRight由父容器的width和padding和Foreground决定
- final int parentRight = right - left - getPaddingRightWithForeground();
- final int parentTop = getPaddingTopWithForeground();
- final int parentBottom = bottom - top - getPaddingBottomWithForeground();
- for (int i = 0; i < count; i++) {
- final View child = getChildAt(i);
- if (child.getVisibility() != GONE) {
- final LayoutParams lp = (LayoutParams) child.getLayoutParams();
- //获取子View的测量宽高
- final int width = child.getMeasuredWidth();
- final int height = child.getMeasuredHeight();
- int childLeft;
- int childTop;
- int gravity = lp.gravity;
- if (gravity == -1) {
- gravity = DEFAULT_CHILD_GRAVITY;
- }
- final int layoutDirection = getLayoutDirection();
- final int absoluteGravity = Gravity.getAbsoluteGravity(gravity, layoutDirection);
- final int verticalGravity = gravity & Gravity.VERTICAL_GRAVITY_MASK;
- //当子View设置了水平方向的layout_gravity属性时,根据不同的属性设置不同的childLeft
- //childLeft表示子View的 左上角坐标X值
- switch (absoluteGravity & Gravity.HORIZONTAL_GRAVITY_MASK) {
- /* 水平居中,由于子View要在水平中间的位置显示,因此,要先计算出以下:
- * (parentRight - parentLeft -width)/2 此时得出的是父容器减去子View宽度后的
- * 剩余空间的一半,那么再加上parentLeft后,就是子View初始左上角横坐标(此时正好位于中间位置),
- * 假如子View还受到margin约束,由于leftMargin使子View右偏而rightMargin使子View左偏,所以最后
- * 是 +leftMargin -rightMargin .
- */
- case Gravity.CENTER_HORIZONTAL:
- childLeft = parentLeft + (parentRight - parentLeft - width) / 2 + lp.leftMargin - lp.rightMargin;
- break;
- //水平居右,子View左上角横坐标等于 parentRight 减去子View的测量宽度 减去 margin
- case Gravity.RIGHT:
- if (!forceLeftGravity) {
- childLeft = parentRight - width - lp.rightMargin;
- break;
- }
- //如果没设置水平方向的layout_gravity,那么它默认是水平居左
- //水平居左,子View的左上角横坐标等于 parentLeft 加上子View的magin值
- case Gravity.LEFT:
- default:
- childLeft = parentLeft + lp.leftMargin;
- }
- //当子View设置了竖直方向的layout_gravity时,根据不同的属性设置同的childTop
- //childTop表示子View的 左上角坐标的Y值
- //分析方法同上
- switch (verticalGravity) {
- case Gravity.TOP:
- childTop = parentTop + lp.topMargin;
- break;
- case Gravity.CENTER_VERTICAL:
- childTop = parentTop + (parentBottom - parentTop - height) / 2 + lp.topMargin - lp.bottomMargin;
- break;
- case Gravity.BOTTOM:
- childTop = parentBottom - height - lp.bottomMargin;
- break;
- default:
- childTop = parentTop + lp.topMargin;
- }
- //对子元素进行布局,左上角坐标为(childLeft,childTop),右下角坐标为(childLeft+width,childTop+height)
- child.layout(childLeft, childTop, childLeft + width, childTop + height);
- }
- }
- }
由源码看出,onLayout方法内部直接调用了layoutChildren方法,而layoutChildren则是具体的实现。整个过程其实就是和我们4.2.1中给出的示例一样
- 遍历子控件
- 根据子View的layout_gravity属性、子View的测量宽高、父容器的padding值、child.margin,和其他子控件累积占用的位置来确定子View的布局参数
- 调用child.layout方法,把布局流程从父容器传递到子元素,开启迭代过程
- 更新累积的宽高
4.3 绘制draw阶段
- 需要了解相关图形学的知识点:Canvas,Paint等
- 画布的就是layout阶段定义的绘制矩阵位置,它一般是根据measure阶段的测量值计算出来的
- 具体绘制的时候,要考虑自己的padding
测量流程决定了View的大小,布局流程决定了View的位置,那么绘制流程将决定View的样子,一个View该显示什么由绘制流程完成。
在开始讲解该阶段前,我们还是按照之前的套路,先初步了解下我们在重写控件(View or ViewGroup)中相关的知识点
4.3.1 重写View或ViewGroup的onDraw()
看一个简单的示例吧,上图片下文本:
- protected void onDraw(Canvas canvas) {
- canvas.drawColor(Color.GRAY);
- /*
- * 绘制
- * 参数就不做单独处理了因为只会Draw一次不会频繁调用
- */
- canvas.drawBitmap(mBitmap, getWidth() / 2 - mBitmap.getWidth() / 2, getHeight() / 2 - mBitmap.getHeight() / 2, null);
- canvas.drawText(mStr, getWidth() / 2, mBitmap.getHeight() + getHeight() / 2 - mBitmap.getHeight() / 2 - mPaint.ascent(), mPaint);
- }
4.3.2 draw过程
4.3.2.1 画布生成过程
可以将ViewRootImpl#performDraw看做整个draw过程的起点:
- private void performDraw() {
- //...
- final boolean fullRedrawNeeded = mFullRedrawNeeded;
- try {
- draw(fullRedrawNeeded);
- } finally {
- mIsDrawing = false;
- Trace.traceEnd(Trace.TRACE_TAG_VIEW);
- }
- //省略...
- }
【步骤1】实际调用了ViewRootImpl#draw方法,并传递了fullRedrawNeeded参数,而该参数由mFullRedrawNeeded成员变量获取,它的作用是判断是否需要重新绘制全部视图,如果是第一次绘制视图,那么显然应该绘制所以的视图,如果由于某些原因,导致了视图重绘,那么就没有必要绘制所有视图。
我们来看看【步骤2】ViewRootImpl#draw:
- private void draw(boolean fullRedrawNeeded) {...
- //【步骤2.1】获取mDirty,该值表示需要重绘的区域
- final Rect dirty = mDirty;
- if (mSurfaceHolder != null) {
- // The app owns the surface, we won't draw.
- dirty.setEmpty();
- if (animating) {
- if (mScroller != null) {
- mScroller.abortAnimation();
- }
- disposeResizeBuffer();
- }
- return;
- }
- //【步骤2.2】如果fullRedrawNeeded为真,则把dirty区域置为整个屏幕,表示整个视图都需要绘制。第一次绘制流程,需要绘制所有视图
- if (fullRedrawNeeded) {
- mAttachInfo.mIgnoreDirtyState = true;
- dirty.set(0, 0, (int)(mWidth * appScale + 0.5f), (int)(mHeight * appScale + 0.5f));
- }
- //省略...
- 【步骤2.3】调用了ViewRootImpl#drawSoftware方法,并把相关参数传递进去
- if (!drawSoftware(surface, mAttachInfo, xOffset, yOffset, scalingRequired, dirty)) {
- return;
- }
- }
【步骤2.1】获取mDirty,该值表示需要重绘的区域
【步骤2.2】如果fullRedrawNeeded为真,则把dirty区域置为整个屏幕,表示整个视图都需要绘制。第一次绘制流程,需要绘制所有视图
【步骤2.3】调用了ViewRootImpl#drawSoftware方法,并把相关参数传递进去,我们看一下该函数:
- private boolean drawSoftware(Surface surface, AttachInfo attachInfo, int xoff, int yoff, boolean scalingRequired, Rect dirty) {
- // Draw with software renderer.
- final Canvas canvas;
- try {
- final int left = dirty.left;
- final int top = dirty.top;
- final int right = dirty.right;
- final int bottom = dirty.bottom;
- //【步骤2.3.1】实例化Canvas对象,并锁定canvas区域,由dirty区域决定
- canvas = mSurface.lockCanvas(dirty);
- // The dirty rectangle can be modified by Surface.lockCanvas()
- //noinspection ConstantConditions
- if (left != dirty.left || top != dirty.top || right != dirty.right || bottom != dirty.bottom) {
- attachInfo.mIgnoreDirtyState = true;
- }
- //【步骤2.3.2】对canvas进行一系列的属性赋值
- canvas.setDensity(mDensity);
- }
- try {
- if (!canvas.isOpaque() || yoff != 0 || xoff != 0) {
- canvas.drawColor(0, PorterDuff.Mode.CLEAR);
- }
- dirty.setEmpty();
- mIsAnimating = false;
- attachInfo.mDrawingTime = SystemClock.uptimeMillis();
- mView.mPrivateFlags |= View.PFLAG_DRAWN;
- try {
- canvas.translate( - xoff, -yoff);
- if (mTranslator != null) {
- mTranslator.translateCanvas(canvas);
- }
- canvas.setScreenDensity(scalingRequired ? mNoncompatDensity: 0);
- attachInfo.mSetIgnoreDirtyState = false;
- //【步骤2.3.3】调用DecorView.draw,正式开始整个递归绘制过程
- mView.draw(canvas);
- }
- }
- return true;
- }
【步骤2.3.1】实例化Canvas对象,并锁定canvas区域,由dirty区域决定
【步骤2.3.2】对canvas进行一系列的属性赋值
【步骤2.3.3】mView.draw(canvas),调用DecorView.draw,正式开始整个递归绘制过程
4.3.2.2 View#draw迭代过程
由于ViewGroup没有重写draw方法,因此所有的View都是调用View#draw方法,因此,我们直接看它的源码:
- public void draw(Canvas canvas) {
- final int privateFlags = mPrivateFlags;
- final boolean dirtyOpaque = (privateFlags & PFLAG_DIRTY_MASK) == PFLAG_DIRTY_OPAQUE && (mAttachInfo == null || !mAttachInfo.mIgnoreDirtyState);
- mPrivateFlags = (privateFlags & ~PFLAG_DIRTY_MASK) | PFLAG_DRAWN;
- /*
- * Draw traversal performs several drawing steps which must be executed
- * in the appropriate order:
- *
- * 1. Draw the background
- * 2. If necessary, save the canvas' layers to prepare for fading
- * 3. Draw view's content
- * 4. Draw children
- * 5. If necessary, draw the fading edges and restore layers
- * 6. Draw decorations (scrollbars for instance)
- */
- // Step 1, draw the background, if needed
- int saveCount;
- if (!dirtyOpaque) {
- drawBackground(canvas);
- }
- // skip step 2 & 5 if possible (common case)
- final int viewFlags = mViewFlags;
- boolean horizontalEdges = (viewFlags & FADING_EDGE_HORIZONTAL) != 0;
- boolean verticalEdges = (viewFlags & FADING_EDGE_VERTICAL) != 0;
- if (!verticalEdges && !horizontalEdges) {
- // Step 3, draw the content
- if (!dirtyOpaque) onDraw(canvas);
- // Step 4, draw the children
- dispatchDraw(canvas);
- // Overlay is part of the content and draws beneath Foreground
- if (mOverlay != null && !mOverlay.isEmpty()) {
- mOverlay.getOverlayView().dispatchDraw(canvas);
- }
- // Step 6, draw decorations (foreground, scrollbars)
- onDrawForeground(canvas);
- // we're done...
- return;
- }...
- }
可以看到,draw过程比较复杂,但是逻辑十分清晰,而官方注释也清楚地说明了每一步的做法。我们首先来看一开始的标记位dirtyOpaque,该标记位的作用是判断当前View是否是透明的,如果View是透明的,那么根据下面的逻辑可以看出,将不会执行一些步骤,比如绘制背景、绘制内容等。这样很容易理解,因为一个View既然是透明的,那就没必要绘制它了。
接着是绘制流程的六个步骤,这里先小结这六个步骤分别是什么,然后再展开来讲:
- 对View的背景进行绘制
- 保存当前的图层信息(可跳过)
- 绘制View的内容,这里调用了View#onDraw方法
- 每个View都需要重载该方法;ViewGroup一般不需要实现该方法,除非有特定效果
- 对View的子View进行绘制(如果有子View),这里调用了dispatchDraw(canvas)实现迭代绘制过程
- dispatchDraw()方法内部会遍历每个子视图,调用drawChild()去重新回调每个子视图的draw()方法(注意,这个 地方“需要重绘”的视图才会调用draw()方法)
- 值得说明的是,ViewGroup类已经为我们重写了dispatchDraw ()的功能实现,应用程序一般不需要重写该方法,但可以重载父类函数实现具体的功能
- 绘制View的褪色的边缘,类似于阴影效果(可跳过)
- 绘制View的装饰(例如:滚动条)
在这里我们只讲3和4,想了解更多的可查看Android View 绘制流程(Draw) 完全解析
Step 3:绘制内容
这里调用了View#onDraw方法,View中该方法是一个空实现,因为不同的View有着不同的内容,这需要我们自己去实现,即在自定义View中重写该方法来实现。
Step 4: 绘制子View
如果当前的View是一个ViewGroup类型,那么就需要绘制它的子View,这里调用了dispatchDraw,而View中该方法是空实现,实际是ViewGroup重写了这个方法,那么我们来看看,ViewGroup#dispatchDraw:
- protected void dispatchDraw(Canvas canvas) {
- boolean usingRenderNodeProperties = canvas.isRecordingFor(mRenderNode);
- final int childrenCount = mChildrenCount;
- final View[] children = mChildren;
- int flags = mGroupFlags;
- for (int i = 0; i < childrenCount; i++) {
- while (transientIndex >= 0 && mTransientIndices.get(transientIndex) == i) {
- final View transientChild = mTransientViews.get(transientIndex);
- if ((transientChild.mViewFlags & VISIBILITY_MASK) == VISIBLE ||
- transientChild.getAnimation() != null) {
- more |= drawChild(canvas, transientChild, drawingTime);
- }
- transientIndex++;
- if (transientIndex >= transientCount) {
- transientIndex = -1;
- }
- }
- int childIndex = customOrder ? getChildDrawingOrder(childrenCount, i) : i;
- final View child = (preorderedList == null)
- ? children[childIndex] : preorderedList.get(childIndex);
- if ((child.mViewFlags & VISIBILITY_MASK) == VISIBLE || child.getAnimation() != null) {
- more |= drawChild(canvas, child, drawingTime);
- }
- }
- //省略...
- }
源码很长,这里简单说明一下,里面主要遍历了所以子View,针对每个子View都调用了drawChild这个方法,我们找到这个方法,ViewGroup#drawChild:
- protected boolean drawChild(Canvas canvas, View child, long drawingTime) {
- return child.draw(canvas, this, drawingTime);
- }
可以看出,这里调用了View的draw方法,但这个方法并不是上面所说的,因为参数不同,我们来看看这个方法,View#draw:
- boolean draw(Canvas canvas, ViewGroup parent, long drawingTime) {
- //省略...
- if (!drawingWithDrawingCache) {
- if (drawingWithRenderNode) {
- mPrivateFlags &= ~PFLAG_DIRTY_MASK; ((DisplayListCanvas) canvas).drawRenderNode(renderNode);
- } else {
- // Fast path for layouts with no backgrounds
- if ((mPrivateFlags & PFLAG_SKIP_DRAW) == PFLAG_SKIP_DRAW) {
- mPrivateFlags &= ~PFLAG_DIRTY_MASK;
- dispatchDraw(canvas);
- } else {
- draw(canvas);
- }
- }
- } else if (cache != null) {
- mPrivateFlags &= ~PFLAG_DIRTY_MASK;
- if (layerType == LAYER_TYPE_NONE) {
- // no layer paint, use temporary paint to draw bitmap
- Paint cachePaint = parent.mCachePaint;
- if (cachePaint == null) {
- cachePaint = new Paint();
- cachePaint.setDither(false);
- parent.mCachePaint = cachePaint;
- }
- cachePaint.setAlpha((int)(alpha * 255));
- canvas.drawBitmap(cache, 0.0f, 0.0f, cachePaint);
- } else {
- // use layer paint to draw the bitmap, merging the two alphas, but also restore
- int layerPaintAlpha = mLayerPaint.getAlpha();
- mLayerPaint.setAlpha((int)(alpha * layerPaintAlpha));
- canvas.drawBitmap(cache, 0.0f, 0.0f, mLayerPaint);
- mLayerPaint.setAlpha(layerPaintAlpha);
- }
- }
- }
我们主要来看核心部分,首先判断是否已经有缓存,即之前是否已经绘制过一次了,如果没有,则会调用draw(canvas)方法,开始正常的绘制,即上面所说的六个步骤,否则利用缓存来显示
到这里我们基本上就明白View draw的迭代过程了。
五、View的生命周期
- onAttachedToWindow()在整个Activity生命周期的位置及使用
- onFinishInflate 【setContentView阶段完成】当View中所有的子控件均被映射成xml后触发
- onAttachedToWindow()【View绘制前阶段完成】当view被附着到一个窗口时触发,只会调用一次,在界面OnResume()之后,PhoneWindow#addView之前,可用来修改窗口尺寸
- onMeasure(int, int) 确定所有子元素的大小
- onSizeChanged(int, int, int, int) 当view的大小发生变化时触发,在layout阶段的setFrame时触发,常用来确定确定View大小(记录当前View的宽高)
- onLayout(boolean, int, int, int, int) 当View分配所有的子元素的大小和位置时触发
- onDraw(Canvas) view渲染内容的细节
- onDetachedFromWindow() 当view离开附着的窗口时触发,Android123提示该方法和 onAttachedToWindow() 是相反的。ActivityThread.handleDestroyActivity(),只会调用一次。这时我们就在这个方法做一些收尾工作,如:取消广播注册等等。
- onKeyDown(int, KeyEvent) 有按键按下后触发
- onKeyUp(int, KeyEvent) 有按键按下后弹起时触发
- onTrackballEvent(MotionEvent) 轨迹球事件
- onTouchEvent(MotionEvent) 触屏事件
- onFocusChanged(boolean, int, Rect) 当View获取 或失去焦点时触发
- onWindowFocusChanged(boolean) 当窗口包含的view获取或失去焦点时触发
- onWindowVisibilityChanged(int) 当窗口中包含的可见的view发生变化时触发
5.1 显示过程
- 07-12 13:44:45.413 23734-23734/? D/------﹕ ---onFinanshInflate
- 07-12 13:44:45.443 23734-23734/? D/------﹕ ---onMeasure
- 07-12 13:44:45.493 23734-23734/? D/------﹕ ---onSizeChanged
- 07-12 13:44:45.493 23734-23734/? D/------﹕ ---onLayout
- 07-12 13:44:45.503 23734-23734/? D/------﹕ ---onMeasure
- 07-12 13:44:45.503 23734-23734/? D/------﹕ ---onLayout
- 07-12 13:44:45.503 23734-23734/? D/------﹕ ---onDraw
5.2 invalidate(),requsetLaytout()与requestFocus
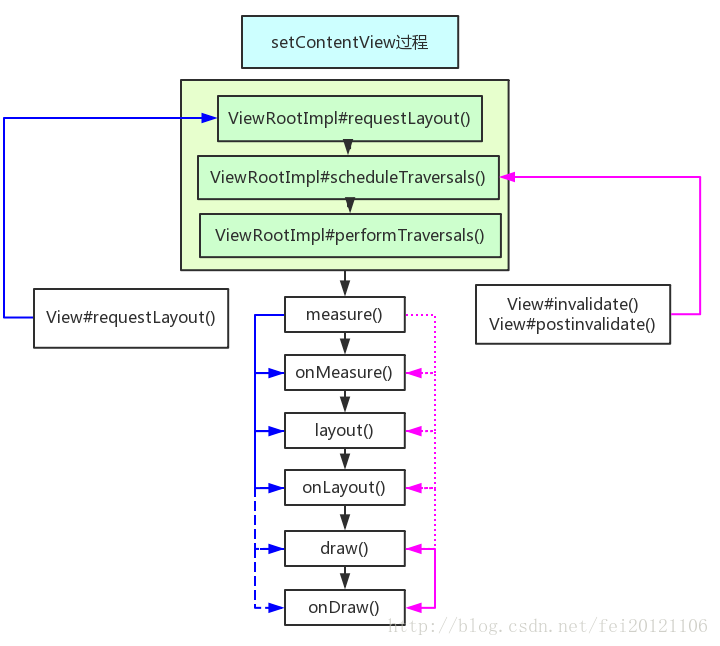
invalidate(),requsetLaytout()以及requestFocus()最终会调用到ViewRoot中的schedulTraversale()方法,该函数然后发起一个异步消息,消息处理中调用performTraverser()方法对整个View进行遍历,也就是说都会触发View绘制过程,但是他们也有一定的区别:通过一定的变量标示,有一些过程一定会重绘经历,但某些可能不需要
- requestLayout()方法
- 一定会导致调用measure()过程 和 layout()过程 ,但是不见得会draw过程
- 对整个View树重新布局layout过程包括measure()和layout()过程,一般不会调用draw()过程,不会重新绘制任何视图包括该调用者本身
- invalidate()方法
- 请求重绘View树,即draw()过程。
- 假如视图发生大小没有变化就不会调用layout()过程,并且只绘制那些“需要重绘的”视图,即谁请求invalidate()方法,就绘制该视图(View的话,只绘制该View ;ViewGroup,则绘制整个ViewGroup)。
- requestFocus()
- 请求View树的draw()过程,但只绘制“需要重绘”的视图
一般来说,如果View确定自身不再适合当前区域,比如说它的LayoutParams发生了改变,需要父布局对其进行重新测量、布局、绘制这三个流程,往往使用requestLayout。
而invalidate则是刷新当前View,使当前View进行重绘,不会进行测量、布局流程,因此如果View只需要重绘而不需要测量,布局的时候,使用invalidate方法往往比requestLayout方法更高效
5.3 requestLayout()引发过程
子View调用requestLayout方法,会标记当前View及父容器,同时逐层向上提交,直到ViewRootImpl处理该事件,ViewRootImpl会调用三大流程,从measure开始,对于每一个含有标记位的view及其子View都会进行测量、布局、绘制。
- 一定会导致调用measure()过程 和 layout()过程 ,但是不见得会draw过程
- 对整个View树重新布局layout过程包括measure()和layout()过程,一般不会调用draw()过程,不会重新绘制任何视图包括该调用者本身
一般会引发requestLayout()的操作如下:
- setVisibility()方法: 当View的可视状态在INVISIBLE/ VISIBLE 转换为GONE状态时,会间接调用requestLayout() 和invalidate方法。 同时,由于整个个View树大小发生了变化,会请求measure()过程以及draw()过程,同样地,只绘制需要“重新绘制”的视图
接下来我们从源码角度进行效果分析,View#requestLayout方法:
- /**
- * Call this when something has changed which has invalidated the
- * layout of this view. This will schedule a layout pass of the view
- * tree. This should not be called while the view hierarchy is currently in a layout
- * pass ({@link #isInLayout()}. If layout is happening, the request may be honored at the
- * end of the current layout pass (and then layout will run again) or after the current
- * frame is drawn and the next layout occurs.
- *
- * <p>Subclasses which override this method should call the superclass method to
- * handle possible request-during-layout errors correctly.</p>
- */
- //从源码注释可以看出,如果当前View在请求布局的时候,View树正在进行布局流程的话,
- //该请求会延迟到布局流程完成后或者绘制流程完成且下一次布局发现的时候再执行。
- @CallSuper public void requestLayout() {
- if (mMeasureCache != null) mMeasureCache.clear();
- if (mAttachInfo != null && mAttachInfo.mViewRequestingLayout == null) {
- // Only trigger request-during-layout logic if this is the view requesting it,
- // not the views in its parent hierarchy
- //【步骤1】判断当前View树是否正在布局流程,如果是该请求会延迟到布局流程完成后或者绘制流程完成且下一次布局发现的时候再执行。
- ViewRootImpl viewRoot = getViewRootImpl();
- if (viewRoot != null && viewRoot.isInLayout()) {
- if (!viewRoot.requestLayoutDuringLayout(this)) {
- return;
- }
- }
- mAttachInfo.mViewRequestingLayout = this;
- }
- //【步骤2】为当前view设置标记位 PFLAG_FORCE_LAYOUT
- mPrivateFlags |= PFLAG_FORCE_LAYOUT;
- mPrivateFlags |= PFLAG_INVALIDATED;
- if (mParent != null && !mParent.isLayoutRequested()) {
- //【步骤3】向父容器请求布局
- mParent.requestLayout();
- }
- if (mAttachInfo != null && mAttachInfo.mViewRequestingLayout == this) {
- mAttachInfo.mViewRequestingLayout = null;
- }
- }
【步骤1】判断当前View树是否正在布局流程,如果是该请求会延迟到布局流程完成后或者绘制流程完成且下一次布局发现的时候再执行
【步骤2】为当前view设置标记位 PFLAG_FORCE_LAYOUT,该标记位的作用就是标记了当前的View是需要进行重新布局的
【步骤3】调用mParent.requestLayout方法,迭代式向父容器请求布局。因为这里是向父容器请求布局,即调用父容器的requestLayout方法,为父容器添加PFLAG_FORCE_LAYOUT标记位,而父容器又会调用它的父容器的requestLayout方法,即requestLayout事件层层向上传递,直到DecorView,即根View,而根View又会传递给ViewRootImpl,也即是说子View的requestLayout事件,最终会被ViewRootImpl接收并得到处理。
纵观这个向上传递的流程,其实是采用了责任链模式,即不断向上传递该事件,直到找到能处理该事件的上级,在这里,只有ViewRootImpl能够处理requestLayout事件。
我们来看最终的【步骤4】ViewRootImpl#requestLayout:
- @Override
- public void requestLayout() {
- if (!mHandlingLayoutInLayoutRequest) {
- checkThread();
- mLayoutRequested = true;
- scheduleTraversals();
- }
- }
有没有很眼熟,是的!它就是<3.2 View绘制的起点>中的过程,在这里,调用了scheduleTraversals方法,这个方法是一个异步方法,最终会调用到ViewRootImpl#performTraversals方法开启整个View绘制过程。
5.3.1 PFLAG_FORCE_LAYOUT标示
上边的讲解基本已经可以续上,整个View绘制过程了,在这里,我们补充说明下绘制过程中的一些变量标示
- PFLAG_FORCE_LAYOUT,,这个标记位的作用就是在View的measure流程中,如果当前View设置了该标记位,则会进行测绘流程
- PFLAG_LAYOUT_REQUIRED,这个标记位的作用就是在View的layout流程中,如果当前View设置了该标记位,则会进行布局流程 View#measure方法:响应PFLAG_FORCE_LAYOUT——如果当前View的标记位为PFLAG_FORCE_LAYOUT,那么就会进行测量流程,调用onMeasure,对该View进行测量,接着最后为标记位设置为PFLAG_LAYOUT_REQUIRED
- public final void measure(int widthMeasureSpec, int heightMeasureSpec) {
- ...
- if ((mPrivateFlags & PFLAG_FORCE_LAYOUT) == PFLAG_FORCE_LAYOUT ||
- widthMeasureSpec != mOldWidthMeasureSpec ||
- heightMeasureSpec != mOldHeightMeasureSpec) {
- ...
- if (cacheIndex < 0 || sIgnoreMeasureCache) {
- // measure ourselves, this should set the measured dimension flag back
- onMeasure(widthMeasureSpec, heightMeasureSpec);
- mPrivateFlags3 &= ~PFLAG3_MEASURE_NEEDED_BEFORE_LAYOUT;
- }
- ...
- mPrivateFlags |= PFLAG_LAYOUT_REQUIRED;
- }
- }
View#layout源码:响应PFLAG_LAYOUT_REQUIRED,如果当前View设置了该标记位,则会进行布局流程
- public void layout(int l, int t, int r, int b) {
- ...
- //判断标记位是否为PFLAG_LAYOUT_REQUIRED,如果有,则对该View进行布局
- if (changed || (mPrivateFlags & PFLAG_LAYOUT_REQUIRED) == PFLAG_LAYOUT_REQUIRED) {
- onLayout(changed, l, t, r, b);
- //onLayout方法完成后,清除PFLAG_LAYOUT_REQUIRED标记位
- mPrivateFlags &= ~PFLAG_LAYOUT_REQUIRED;
- ListenerInfo li = mListenerInfo;
- if (li != null && li.mOnLayoutChangeListeners != null) {
- ArrayList<OnLayoutChangeListener> listenersCopy =
- (ArrayList<OnLayoutChangeListener>)li.mOnLayoutChangeListeners.clone();
- int numListeners = listenersCopy.size();
- for (int i = 0; i < numListeners; ++i) {
- listenersCopy.get(i).onLayoutChange(this, l, t, r, b, oldL, oldT, oldR, oldB);
- }
- }
- }
- //最后清除PFLAG_FORCE_LAYOUT标记位
- mPrivateFlags &= ~PFLAG_FORCE_LAYOUT;
- mPrivateFlags3 |= PFLAG3_IS_LAID_OUT;
- }
5.4 invalidate()引发过程
- 请求重绘View树,即draw()过程。
- 假如视图发生大小没有变化就不会调用layout()过程,并且只绘制那些“需要重绘的”视图,即谁请求invalidate()方法,就绘制该视图(View的话,只绘制该View ;ViewGroup,则绘制整个ViewGroup)
当子View调用了invalidate方法后,会为该View添加一个标记位,同时不断向父容器请求刷新,父容器通过计算得出自身需要重绘的区域,直到传递到ViewRootImpl中,最终触发performTraversals方法,进行开始View树重绘流程(只绘制需要重绘的视图)
一般会引发invalidate()的操作如下:
- 直接调用invalidate()方法,请求重新draw(),但只会绘制调用者本身。
- setSelection()方法 :请求重新draw(),但只会绘制调用者本身。
- setVisibility()方法 : 当View可视状态在INVISIBLE转换VISIBLE时,会间接调用invalidate()方法, 继而绘制该View。
- setEnabled()方法 : 请求重新draw(),但不会重新绘制任何视图包括该调用者本身。
View#invalidate方法:
- public void invalidate() {
- invalidate(true);
- }
- void invalidate(boolean invalidateCache) {
- //【步骤0】生成需要绘制的矩阵:(0,0)到(当前控件大小),该值传给父布局使用的
- invalidateInternal(0, 0, mRight - mLeft, mBottom - mTop, invalidateCache, true);
- }
- void invalidateInternal(int l, int t, int r, int b, boolean invalidateCache,
- boolean fullInvalidate) {
- if (mGhostView != null) {
- mGhostView.invalidate(true);
- return;
- }
- //这里判断该子View是否可见或者是否处于动画中
- if (skipInvalidate()) {
- return;
- }
- //【步骤1】根据View的标记位来判断该子View是否需要重绘,假如View没有任何变化,那么就不需要重绘
- if ((mPrivateFlags & (PFLAG_DRAWN | PFLAG_HAS_BOUNDS)) == (PFLAG_DRAWN | PFLAG_HAS_BOUNDS)
- || (invalidateCache && (mPrivateFlags & PFLAG_DRAWING_CACHE_VALID) == PFLAG_DRAWING_CACHE_VALID)
- || (mPrivateFlags & PFLAG_INVALIDATED) != PFLAG_INVALIDATED
- || (fullInvalidate && isOpaque() != mLastIsOpaque)) {
- if (fullInvalidate) {
- mLastIsOpaque = isOpaque();
- mPrivateFlags &= ~PFLAG_DRAWN;
- }
- //【步骤2】设置PFLAG_DIRTY标记位
- mPrivateFlags |= PFLAG_DIRTY;
- if (invalidateCache) {
- mPrivateFlags |= PFLAG_INVALIDATED;
- mPrivateFlags &= ~PFLAG_DRAWING_CACHE_VALID;
- }
- // Propagate the damage rectangle to the parent view.
- //【步骤3】把需要重绘的区域传递给父容器
- final AttachInfo ai = mAttachInfo;
- final ViewParent p = mParent;
- if (p != null && ai != null && l < r && t < b) {
- final Rect damage = ai.mTmpInvalRect;
- damage.set(l, t, r, b);
- //调用父容器的方法,向上传递事件
- p.invalidateChild(this, damage);
- }
- ...
- }
- }
【步骤0】生成需要绘制的区域矩阵:(0,0)到(当前控件大小),该值传给父布局使用的
【步骤1】根据View的标记位来判断该子View是否需要重绘,假如View没有任何变化,那么就不需要重绘
【步骤2】设置PFLAG_DIRTY标记位
【步骤3】 p.invalidateChild(this, damage);把需要重绘的区域传递给父容器
接着我们看【步骤4】ViewGroup#invalidateChild:
- /**
- * Don't call or override this method. It is used for the implementation of
- * the view hierarchy.
- */
- public final void invalidateChild(View child, final Rect dirty) {
- //设置 parent 等于自身
- ViewParent parent = this;
- final AttachInfo attachInfo = mAttachInfo;
- if (attachInfo != null) {
- // If the child is drawing an animation, we want to copy this flag onto
- // ourselves and the parent to make sure the invalidate request goes
- // through
- final boolean drawAnimation = (child.mPrivateFlags & PFLAG_DRAW_ANIMATION) == PFLAG_DRAW_ANIMATION;
- // Check whether the child that requests the invalidate is fully opaque
- // Views being animated or transformed are not considered opaque because we may
- // be invalidating their old position and need the parent to paint behind them.
- Matrix childMatrix = child.getMatrix();
- final boolean isOpaque = child.isOpaque() && !drawAnimation && child.getAnimation() == null && childMatrix.isIdentity();
- // Mark the child as dirty, using the appropriate flag
- // Make sure we do not set both flags at the same time
- int opaqueFlag = isOpaque ? PFLAG_DIRTY_OPAQUE: PFLAG_DIRTY;
- if (child.mLayerType != LAYER_TYPE_NONE) {
- mPrivateFlags |= PFLAG_INVALIDATED;
- mPrivateFlags &= ~PFLAG_DRAWING_CACHE_VALID;
- }
- //储存子View的mLeft和mTop值
- final int[] location = attachInfo.mInvalidateChildLocation;
- location[CHILD_LEFT_INDEX] = child.mLeft;
- location[CHILD_TOP_INDEX] = child.mTop;
- ...
- do {
- View view = null;
- if (parent instanceof View) {
- view = (View) parent;
- }
- if (drawAnimation) {
- if (view != null) {
- view.mPrivateFlags |= PFLAG_DRAW_ANIMATION;
- } else if (parent instanceof ViewRootImpl) { ((ViewRootImpl) parent).mIsAnimating = true;
- }
- }
- // If the parent is dirty opaque or not dirty, mark it dirty with the opaque
- // flag coming from the child that initiated the invalidate
- if (view != null) {
- if ((view.mViewFlags & FADING_EDGE_MASK) != 0 && view.getSolidColor() == 0) {
- opaqueFlag = PFLAG_DIRTY;
- }
- if ((view.mPrivateFlags & PFLAG_DIRTY_MASK) != PFLAG_DIRTY) {
- //【步骤4.1】对当前View的标记位进行设置
- view.mPrivateFlags = (view.mPrivateFlags & ~PFLAG_DIRTY_MASK) | opaqueFlag;
- }
- }
- //【步骤4.2】调用ViewGrup的invalidateChildInParent,如果已经达到最顶层view,则调用ViewRootImpl
- //的invalidateChildInParent。
- parent = parent.invalidateChildInParent(location, dirty);
- if (view != null) {
- // Account for transform on current parent
- Matrix m = view.getMatrix();
- if (!m.isIdentity()) {
- RectF boundingRect = attachInfo.mTmpTransformRect;
- boundingRect.set(dirty);
- m.mapRect(boundingRect);
- dirty.set((int)(boundingRect.left - 0.5f), (int)(boundingRect.top - 0.5f), (int)(boundingRect.right + 0.5f), (int)(boundingRect.bottom + 0.5f));
- }
- }
- } while ( parent != null );
- }
- }
【步骤4】在ViewGroup#invalidateChild方法内部,先设置当前视图的标记位,接着有一个do…while…循环,该循环的作用主要是不断向上回溯父容器,求得父容器和子View需要重绘的区域的并集(dirty)。当父容器不是ViewRootImpl的时候,调用的是ViewGroup的invalidateChildInParent方法,我们来看看这个方法,
【步骤4.2.1】ViewGroup#invalidateChildInParent:调用offset方法,把当前dirty区域的坐标转化为父容器中的坐标,接着调用union方法,把子dirty区域与父容器的区域求并集,换句话说,dirty区域变成父容器区域。最后返回当前视图的父容器,以便进行下一次循环
【步骤4.2.2】由于不断向上调用父容器的方法,到最后会调用到ViewRootImpl的invalidateChildInParent方法:进行offset和union对坐标的调整,然后把dirty区域的信息保存在mDirty中,最后调用了ViewRootImpl#scheduleTraversals方法: 由于没有添加measure和layout的标记位,因此measure、layout流程不会执行,而是直接从draw流程开始
- @Override public ViewParent invalidateChildInParent(int[] location, Rect dirty) {
- checkThread();
- if (DEBUG_DRAW) Log.v(TAG, "Invalidate child: " + dirty);
- if (dirty == null) {
- invalidate();
- return null;
- } else if (dirty.isEmpty() && !mIsAnimating) {
- return null;
- }
- if (mCurScrollY != 0 || mTranslator != null) {
- mTempRect.set(dirty);
- dirty = mTempRect;
- if (mCurScrollY != 0) {
- dirty.offset(0, -mCurScrollY);
- }
- if (mTranslator != null) {
- mTranslator.translateRectInAppWindowToScreen(dirty);
- }
- if (mAttachInfo.mScalingRequired) {
- dirty.inset( - 1, -1);
- }
- }
- final Rect localDirty = mDirty;
- if (!localDirty.isEmpty() && !localDirty.contains(dirty)) {
- mAttachInfo.mSetIgnoreDirtyState = true;
- mAttachInfo.mIgnoreDirtyState = true;
- }
- // Add the new dirty rect to the current one
- localDirty.union(dirty.left, dirty.top, dirty.right, dirty.bottom);
- // Intersect with the bounds of the window to skip
- // updates that lie outside of the visible region
- final float appScale = mAttachInfo.mApplicationScale;
- final boolean intersected = localDirty.intersect(0, 0, (int)(mWidth * appScale + 0.5f), (int)(mHeight * appScale + 0.5f));
- if (!intersected) {
- localDirty.setEmpty();
- }
- if (!mWillDrawSoon && (intersected || mIsAnimating)) {
- scheduleTraversals();
- }
- return null;
- }
5.5 postInvalidate()引发过程
这个方法与invalidate方法的作用是一样的,都是使View树重绘,但两者的使用条件不同,postInvalidate是在非UI线程中调用,invalidate则是在UI线程中调用
View#postInvalidate:
- public void postInvalidate() {
- postInvalidateDelayed(0);
- }
- public void postInvalidateDelayed(long delayMilliseconds) {
- // We try only with the AttachInfo because there's no point in invalidating
- // if we are not attached to our window
- final AttachInfo attachInfo = mAttachInfo;
- if (attachInfo != null) {
- attachInfo.mViewRootImpl.dispatchInvalidateDelayed(this, delayMilliseconds);
- }
- }
【步骤1】由以上代码可以看出,只有attachInfo不为null的时候才会继续执行,即只有确保视图被添加到窗口的时候才会通知view树重绘,因为这是一个异步方法,如果在视图还未被添加到窗口就通知重绘的话会出现错误,所以这样要做一下判断 【步骤2】调用了ViewRootImpl#dispatchInvalidateDelayed方法:用了Handler,发送了一个异步消息到主线程,显然这里发送的是MSG_INVALIDATE,即通知主线程刷新视图
- public void dispatchInvalidateDelayed(View view, long delayMilliseconds) {
- Message msg = mHandler.obtainMessage(MSG_INVALIDATE, view);
- mHandler.sendMessageDelayed(msg, delayMilliseconds);
- }
【步骤3】具体的实现逻辑我们可以看看该mHandler的实现:
- final ViewRootHandler mHandler = new ViewRootHandler();
- final class ViewRootHandler extends Handler {
- @Override
- public String getMessageName(Message message) {
- ....
- }
- @Override
- public void handleMessage(Message msg) {
- switch (msg.what) {
- case MSG_INVALIDATE:
- ((View) msg.obj).invalidate();
- break;
- ...
- }
- }
- }
可以看出,参数message传递过来的正是View视图的实例,然后直接调用了invalidate方法,然后继续invalidate流程
参考文献
-
陈育的简书博客
- Android View源码解读:浅谈DecorView与ViewRootImpl
- Android View 测量流程(Measure)完全解析
- Android View 布局流程(Layout)完全解析
- Android View 绘制流程(Draw) 完全解析
- Android View 深度分析requestLayout、invalidate与postInvalidate
- 深入理解Android之View的绘制流程
-
Android中View绘制流程以及invalidate()等相关方法分析
- Android中将布局文件/View添加至窗口过程分析 —- 从setContentView()谈起
- Android中measure过程、WRAP_CONTENT详解以及xml布局文件解析流程浅析(上)
- Android中measure过程、WRAP_CONTENT详解以及xml布局文件解析流程浅析(下)
- 自定义控件三部曲视图篇(一)——测量与布局
来源: https://juejin.im/entry/5a0d2f5df265da431a42bee2